Creating a Canvas
This reference article covers the necessary steps involved in creating, maintaining, and testing a Canvas. Follow this guide, or check out our Canvas Braze Learning course.
As of February 28, 2023, you can no longer create or duplicate Canvases using the original Canvas experience. Braze recommends that customers who use the original Canvas experience move to Canvas Flow. It’s an improved editing experience to better build and manage Canvases. Learn more about cloning your Canvases to Canvas Flow.
Step 1: Create a new Canvas
Go to Messaging > Canvas, then click Create Canvas.
If you are using the older navigation, you can find Canvas under Engagement.
Step 2: Set up your Canvas
The Canvas builder will guide you step-by-step through setting up your Canvas—everything from naming it to setting conversion events and bringing the right users into your customer journey. Click on each of the following tabs to see what settings you can adjust in each of the builder steps.
Here, you will set up the basics of your Canvas:
- Name your Canvas
- Add teams
- Add tags
- Assign conversion events, and choose their event types and deadlines
Learn more about the Basics step.
Here, you will decide how your users will enter your Canvas:
- Scheduled: This is a time-based Canvas entry
- Action-Based: Your user will enter your Canvas after they perform a defined action
- API-Triggered: Use an API request to enter users into your Canvas
Learn more about the Entry Schedule step.
Here, you will select your target audience:
- Create your audience by adding segments and filters
- Fine-tune Canvas re-entry and entry limits
- See a summary of your target audience
Learn more about the Target Audience step.
Here, you will select your Canvas Send Settings:
- Select your subscription settings
- Set a send rate limit for your Canvas messages
- Enable and set Quiet Hours
Learn more about the Send Settings step.
Here, you will build your Canvas.
Learn how to build your Canvas using the Canvas builder.
Here, you will find the summary of your Canvas details. If you have the Canvas approval workflow turned on, you can approve the listed Canvas details before launching.
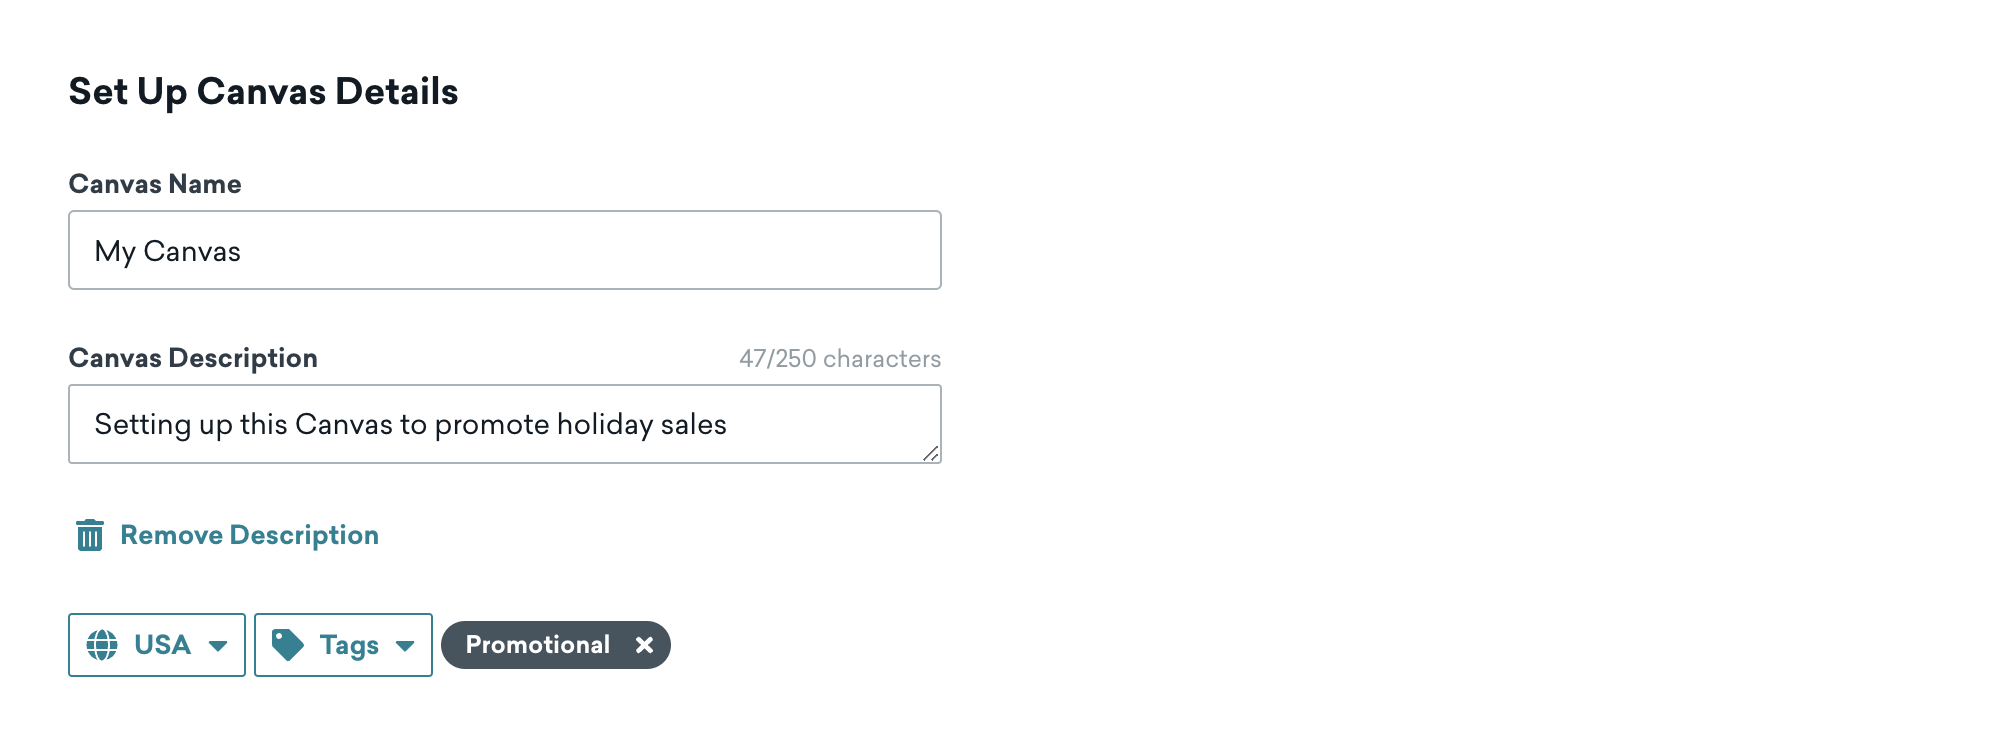
Step 2a: Start with your Canvas basics
Here, you’ll name your Canvas, assign Teams, and create or add Tags. You can also assign conversion events for the Canvas.
Tag your Canvases so they’re easy to find and build reports out of. For instance, when using Report Builder, you can filter by particular tags.
Choose conversion events
Choose your conversion event type, then select the conversions to record. These conversion events will measure the efficiency of your Canvas.
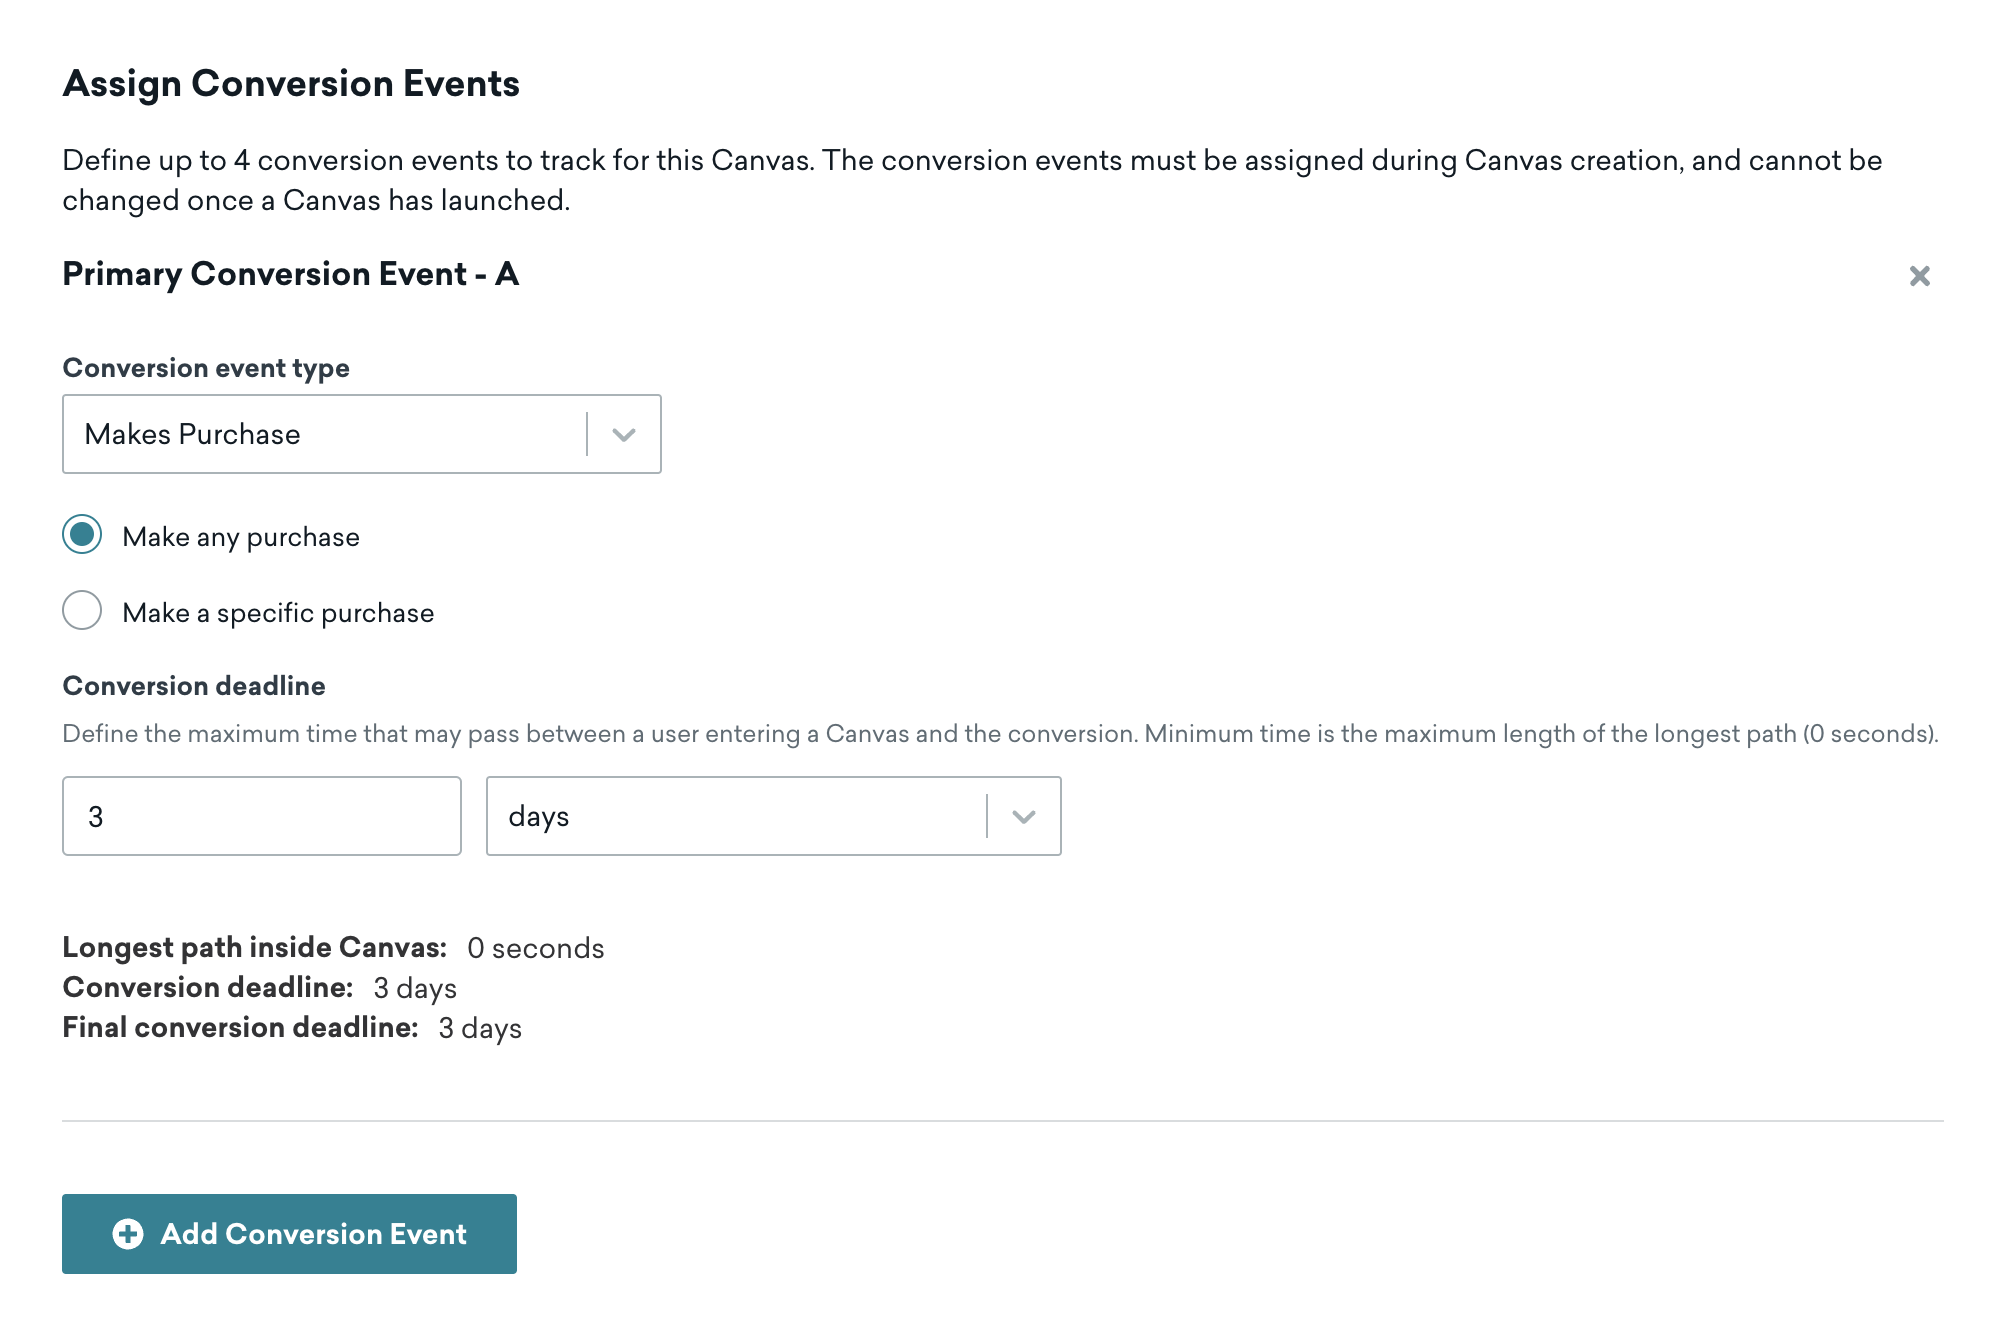
If your Canvas has multiple variants or a control group, Braze will use this conversion event to determine the best variation for achieving this conversion goal. Using the same logic, you can create multiple conversion events.
Step 2b: Determine your Canvas entry schedule
You can choose one of three ways in which users can enter your Canvas.
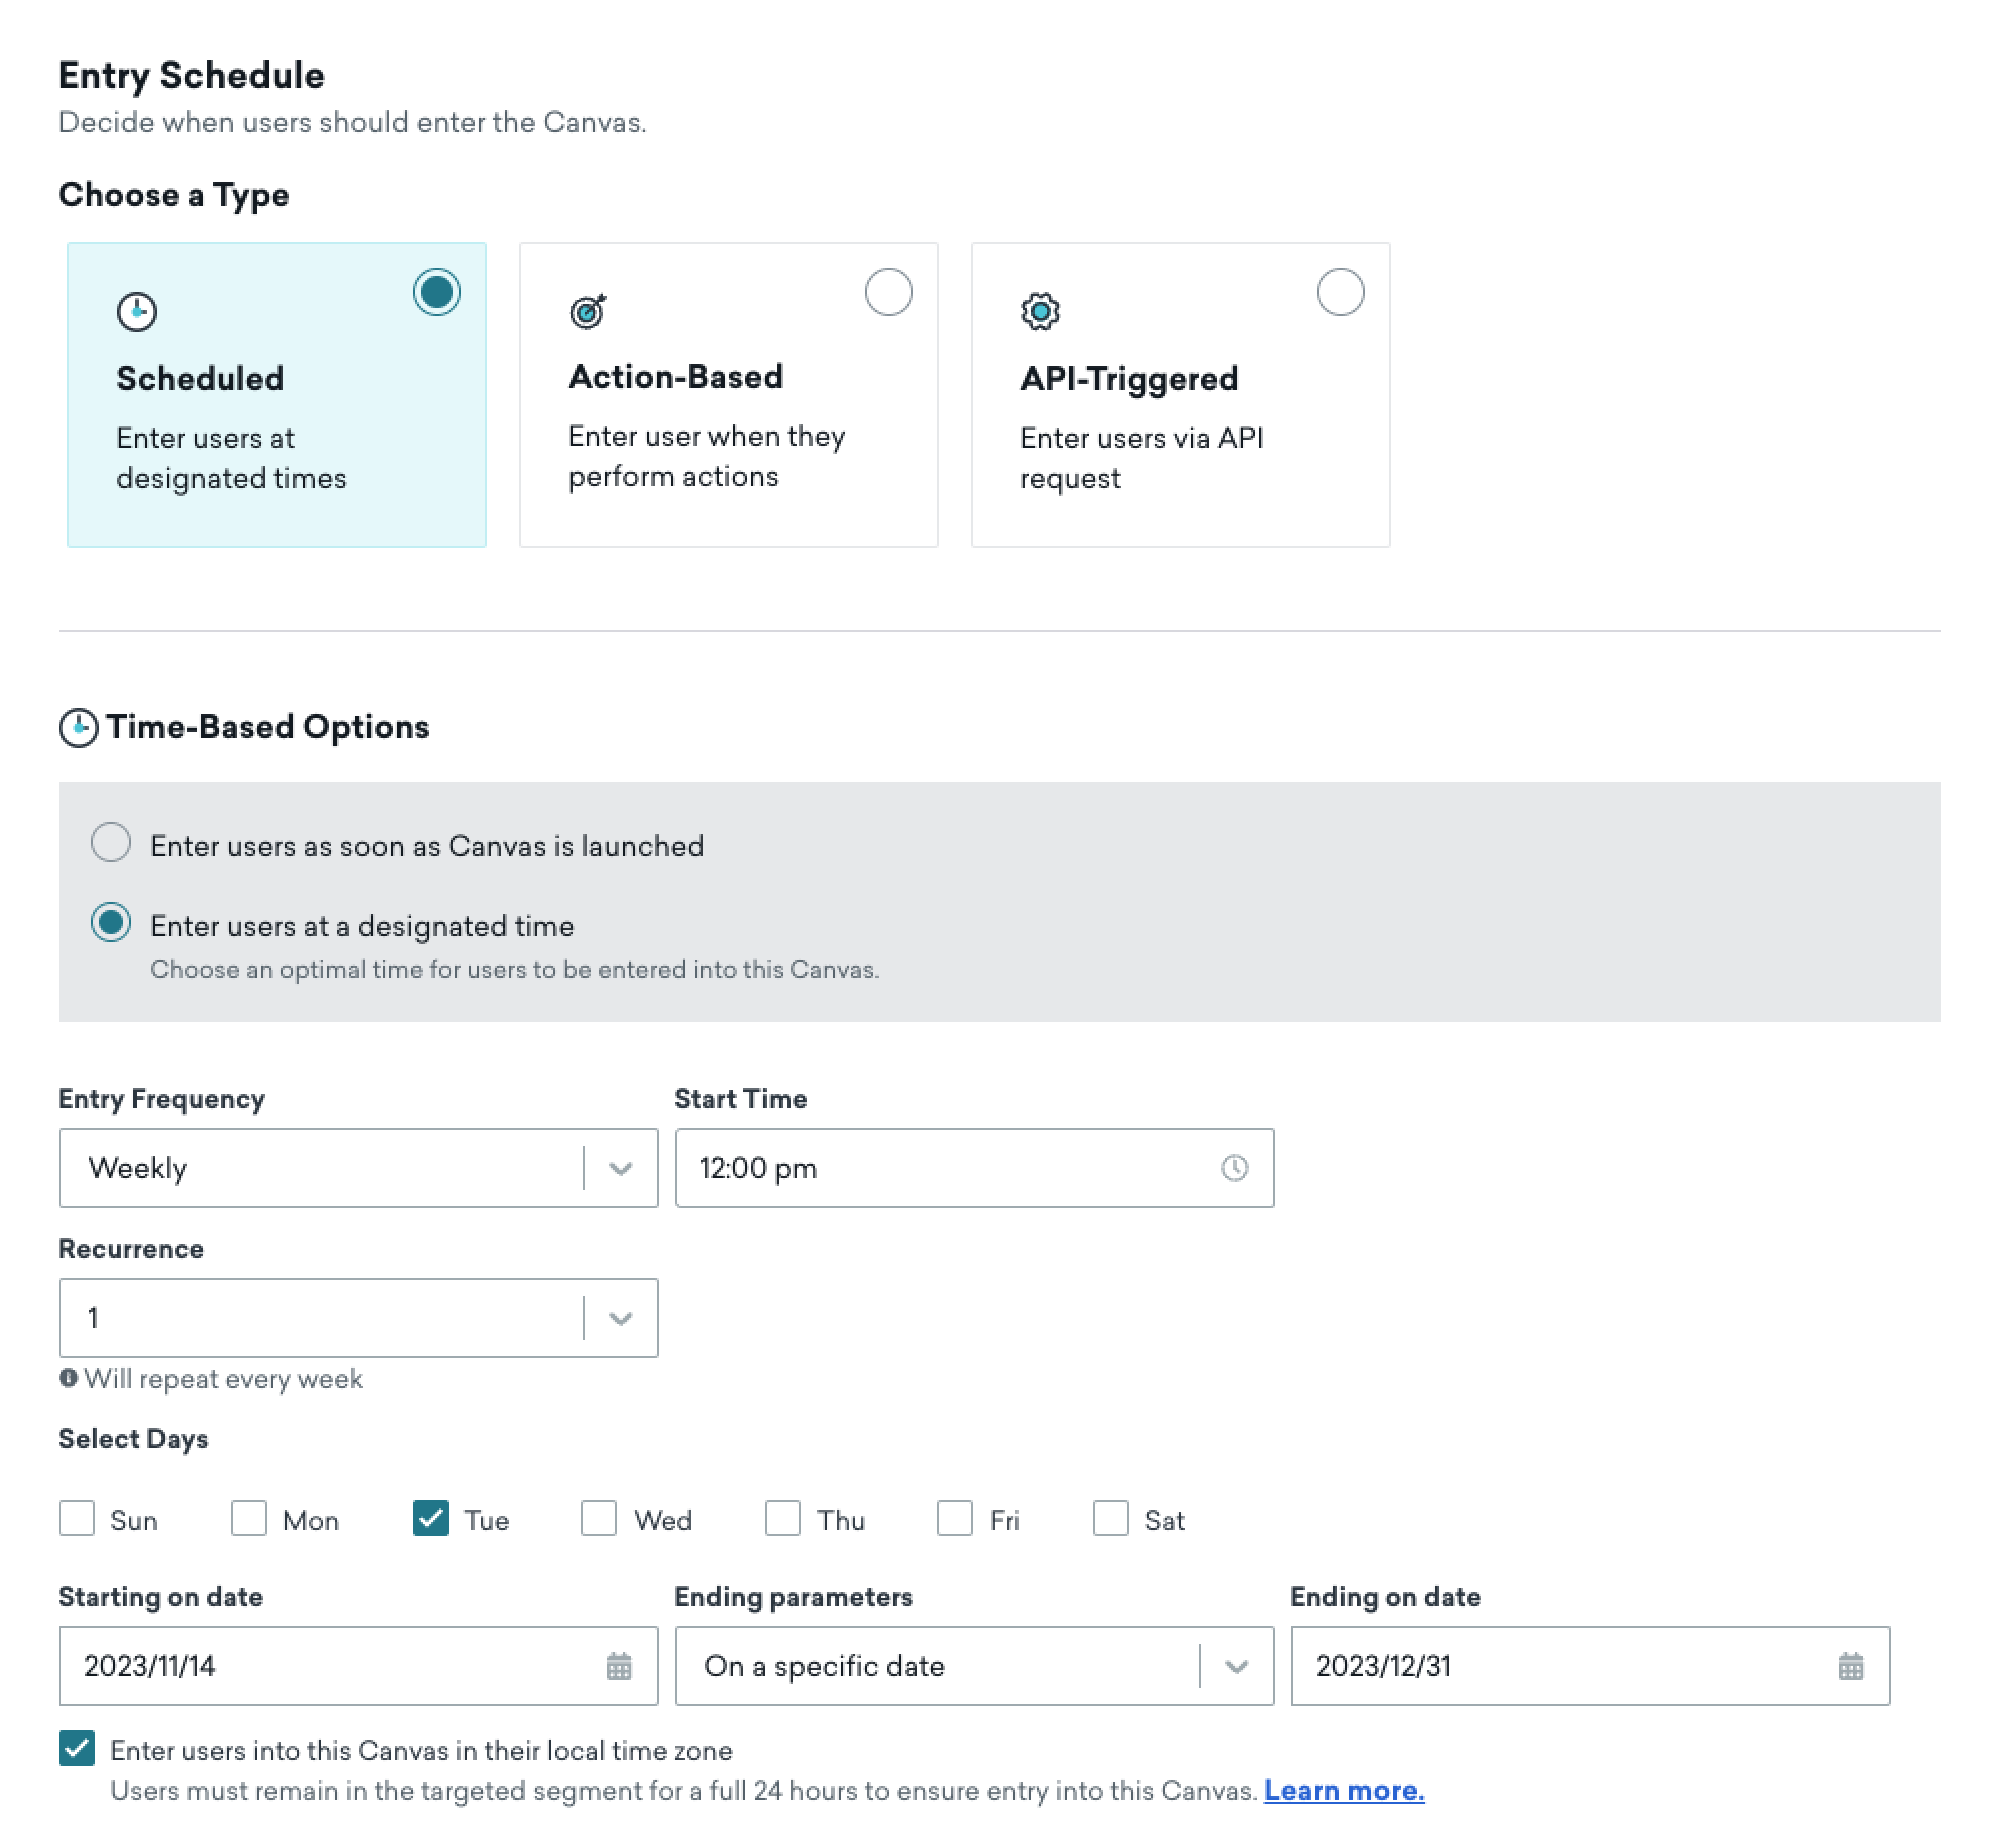
Entry schedule types
With scheduled delivery, users will enter on a time schedule, similarly to how you would schedule a campaign. You can enroll users in a Canvas as soon as it is launched, enter them into your journey at some point in the future, or on a recurring basis (daily, weekly, or monthly).
In this example, based on the time-based options, users will enter this Canvas every Tuesday at 12 pm in their local time zone every week, beginning November 14, 2023 until December 31, 2023.
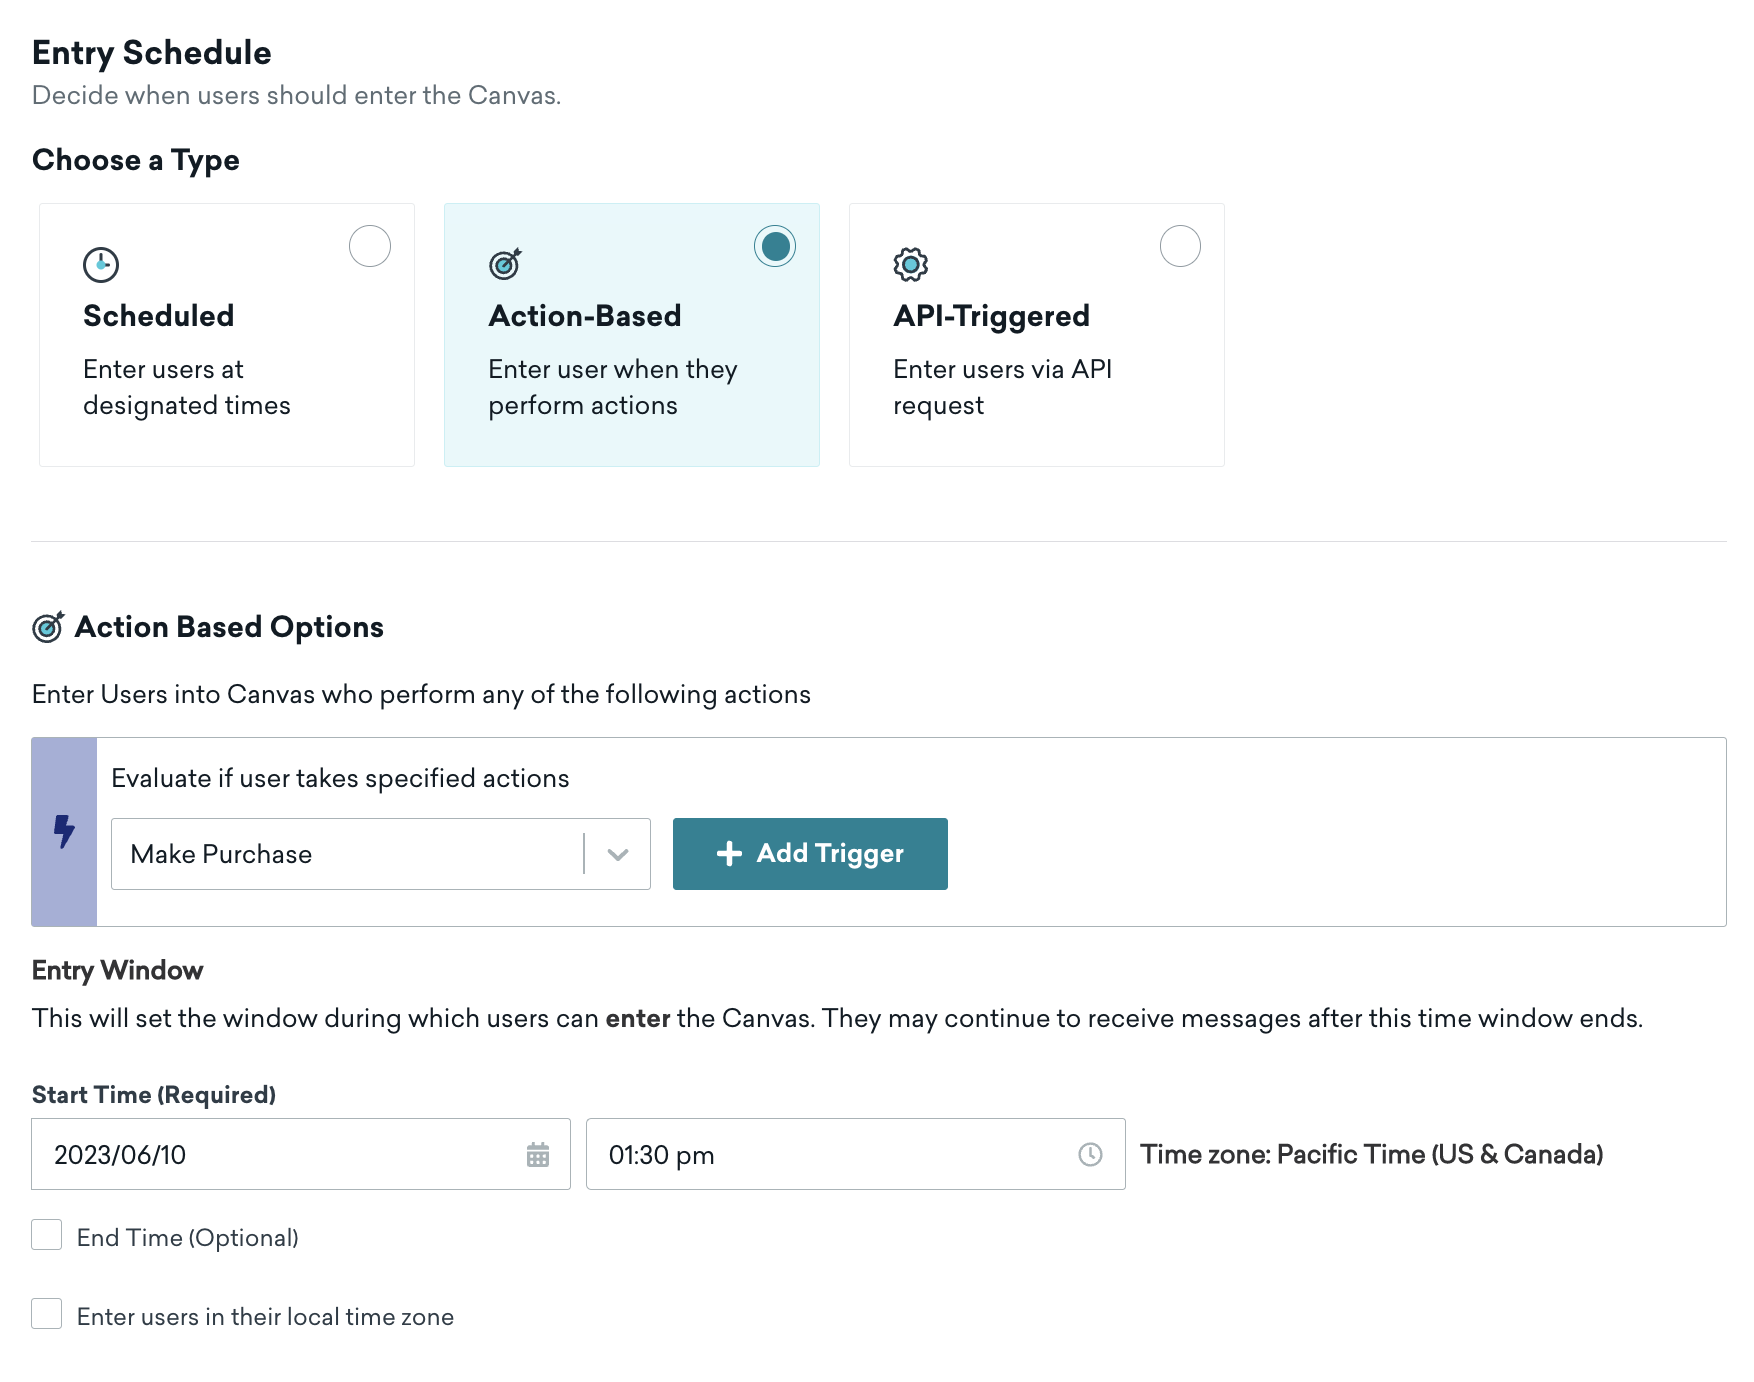
With action-based delivery, users will enter the Canvas and begin receiving messages when they take particular actions, such as opening your app, making a purchase, or triggering a custom event.
You can control other aspects of the Canvas behavior from the Entry Audience window, including rules for re-eligibility and frequency capping settings. Note that action-based delivery is unavailable for Canvas components with in-app messages.
With API-triggered delivery, users will enter your Canvas and begin receiving messages after they have been added using the /canvas/trigger/send endpoint via the API. In the dashboard, you can find an example cURL request that does this as well as assign optional canvas_entry_properties using the Canvas entry properties object.

You can use the following endpoints for API-triggered delivery:
After selecting your delivery method, adjust the settings to match your use case, then continue to setting your target audience.
Deduplicate behavior for Canvases using the original editor
Should the window of re-eligibility be less than the maximum duration of the Canvas, a user will be allowed to re-enter and receive more than one component’s messages. In the edge case where a user’s re-entry reaches the same component as its previous entry, Braze will deduplicate that component’s messages.
If a user re-enters the Canvas, reaches the same component as their previous entry, and is eligible for an in-app message for each entry, the user will get the message twice (depending on in-app message priority) as long as they re-open a session two times.
Step 2c: Set your target entry audience
You can set the target audience for your Canvas on the Target Audience step. Only the users who match your defined criteria can enter the journey, meaning Braze evaluates the target audience for eligibility first before users enter the Canvas journey.
Under Entry Controls, you can limit the number of users every time the Canvas is scheduled to run. For API trigger-based Canvases, this limit occurs at every UTC hour. For example, if you want to target new users, you can limit a particular journey to users who first used your app less than 3 weeks ago. You can also control settings such as whether messages should be sent to users who are subscribed or opted-in to your notifications.
Avoid configuring an action-based campaign or Canvas with the same trigger as the audience filter (such as a changed attribute or performed a custom event). A race condition may occur in which the user is not in the audience at the time they perform the trigger event, which means they won’t receive the campaign or enter the Canvas.
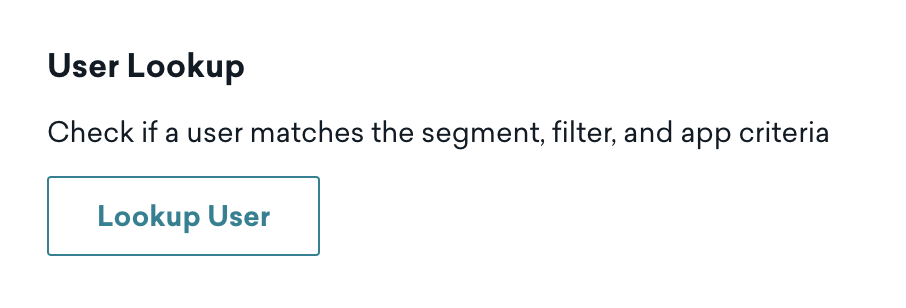
Testing your audience
After adding segments and filters to your target audience, you can test if your audience is set up as expected by looking up a user to confirm if they match the audience criteria.
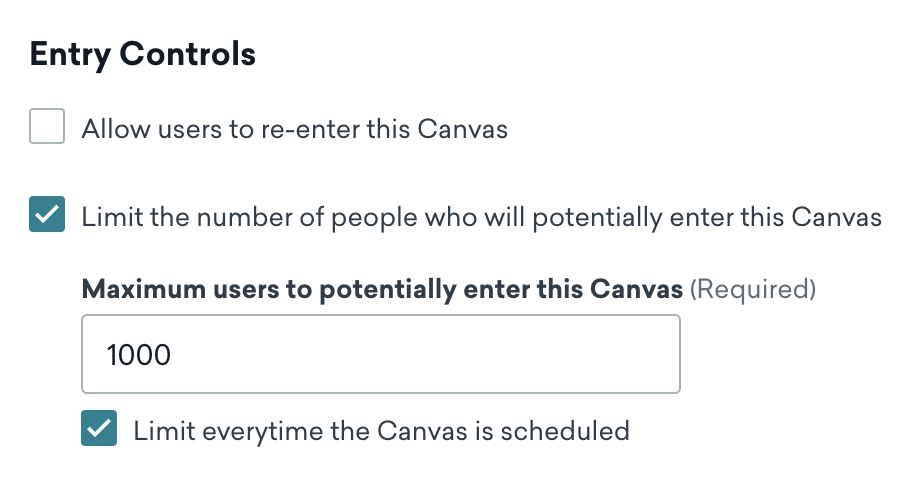
Adjust entry controls
Entry controls determine if users are allowed to re-enter a Canvas. You can also limit the number of people who would potentially enter this Canvas. For example, if you set the Maximum users to potentially enter this Canvas field to 1,000 users, and select the Limit everytime the Canvas is scheduled checkbox, then the Canvas will sent to 1,000 users per day.
Setting exit criteria
Setting the exit criteria determines which users you want to exit a Canvas. If a user performs the exception event or matches the segments and filters, they won’t receive any further messages.
Step 2d: Select your send settings
Click Send Settings to select your subscription settings, turn on rate limiting, and to enable Quiet Hours. By turning on rate limiting or frequency capping, you can ease the marketing pressure placed on your users and ensure you aren’t over messaging them.
For Canvases targeting email and push channels, you may want to limit your Canvas so that only the users who are explicitly opted in will receive the message (excluding subscribed or unsubscribed users). For example, say you have three users of different opt-in status:
- User A is subscribed to email and is push enabled. This user doesn’t receive the email but will receive the push.
- User B is opted-in to email but is not push enabled. This user will receive the email but doesn’t receive the push.
- User C is opted-in to email and is push enabled. This user will receive both the email and the push.
To do so, set the Subscription Settings to send this Canvas to “opted-in users only”. This option will ensure that only opted-in users will receive your email, and Braze will only send your push to users who are push enabled by default.
These subscription settings are applied on a per-step basis, meaning that there is no effect on the entry audience. So, this setting is used to evaluate a user’s eligibility to receive each Canvas step.
With this configuration, don’t include any filters in the Target Users step that limits the audience to a single channel (for example, Push Enabled = True or Email Subscription = Opted-In).
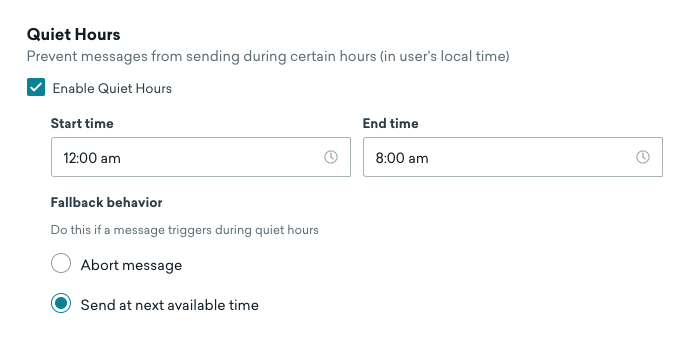
If desired, specify Quiet Hours (the time during which your messages will not be sent) for your Canvas. Check Enable Quiet Hours in your Send Settings. Then, select your Quiet Hours in your user’s local time and what action will follow if the message triggers inside of those Quiet Hours.
Step 3: Build your Canvas
Adding a variant

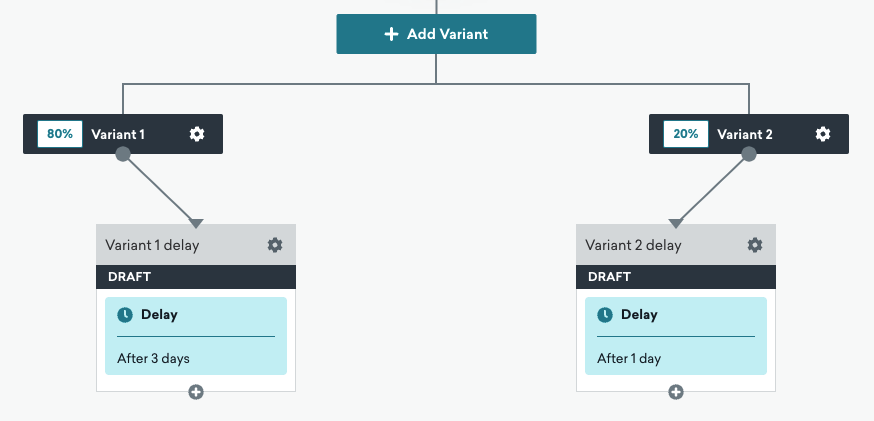
Click Add Variant and select the option to add a new variant to your Canvas. Variants represent a journey that your users will take and can contain multiple steps and branches.
You can add additional variants by clicking the plus button. When you add new variants, you’ll be able to adjust how your users will be distributed between them so that you can cross-compare and analyze the efficacy of different engagement strategies.
By default, the Canvas variant assignment is locked in when users enter the Canvas, meaning that if a user first enters a variant, that will be their variant every time they re-enter the Canvas. However, there are ways to circumvent this behavior.
To do so, you can create a random number generator using Liquid, run it at the beginning of each user’s Canvas entry, store the value as a custom attribute, and then use that attribute to randomly divide users.
Expand for steps
- Create a custom attribute to store your random number. Name it something easy to locate, like “lottery_number” or “random_assignment”. You can create the attribute either in your dashboard, or through API calls to our
/users/trackendpoint. - Create a webhook campaign at the beginning of your Canvas. This campaign will be the medium in which you create your random number and store it as a custom attribute. Refer to Creating a webhook for more. Set the URL to our
/users/trackendpoint. - Create the random number generator. You can do so with the code outlined here, which takes advantage of each user’s unique time of entry to create a random number. Set the resulting number as a Liquid variable within your webhook campaign.
- Format the
/users/trackcall on your webhook campaign so that it sets the custom attribute you created in step 1 to the random number you’ve generated on your current user’s profile. When this step runs, you will have successfully made a random number that changes each time a user enters your campaign. - Adjust the branches of your Canvas so that, instead of being divided by randomly chosen variants, they are divided based on audience rules. In the audience rules of each branch, set the audience filter according to your custom attribute.
For example, one branch may have “lottery_number is less than 3” as an audience filter, while another branch may have “lottery_number is more than 3 and less than 6” as an audience filter.
Adding steps
You can add more steps to your Canvas workflow by dragging and dropping components from the Components sidebar. Or, when you click the plus button, you can also add a component with the popover menu.
As you begin to add more steps, you can switch up the zoom level to focus in on details or take in the entire user journey. Zoom in with Shift + + or zoom out with Shift + -.
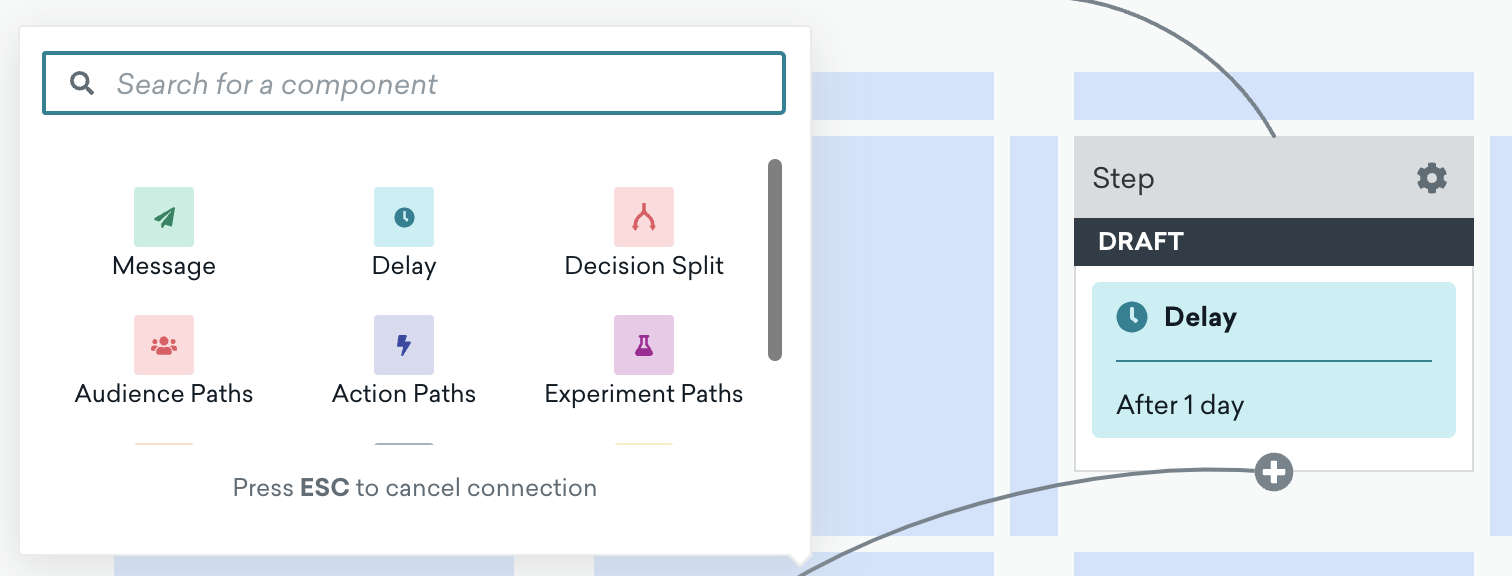
A Canvas built using Canvas Flow can contain up to 200 steps. If your Canvas exceeds 200 steps, loading issues will occur.
Maximum duration
As your Canvas journey increases in steps, the maximum duration is the longest possible time a user can take to complete this Canvas. This is calculated by adding the delays and trigger windows of each step for each variant for the longest path. For example, if your Canvas has a Delay step with a delay of 3 days and a Message step, the maximum duration of your Canvas will be 3 days.
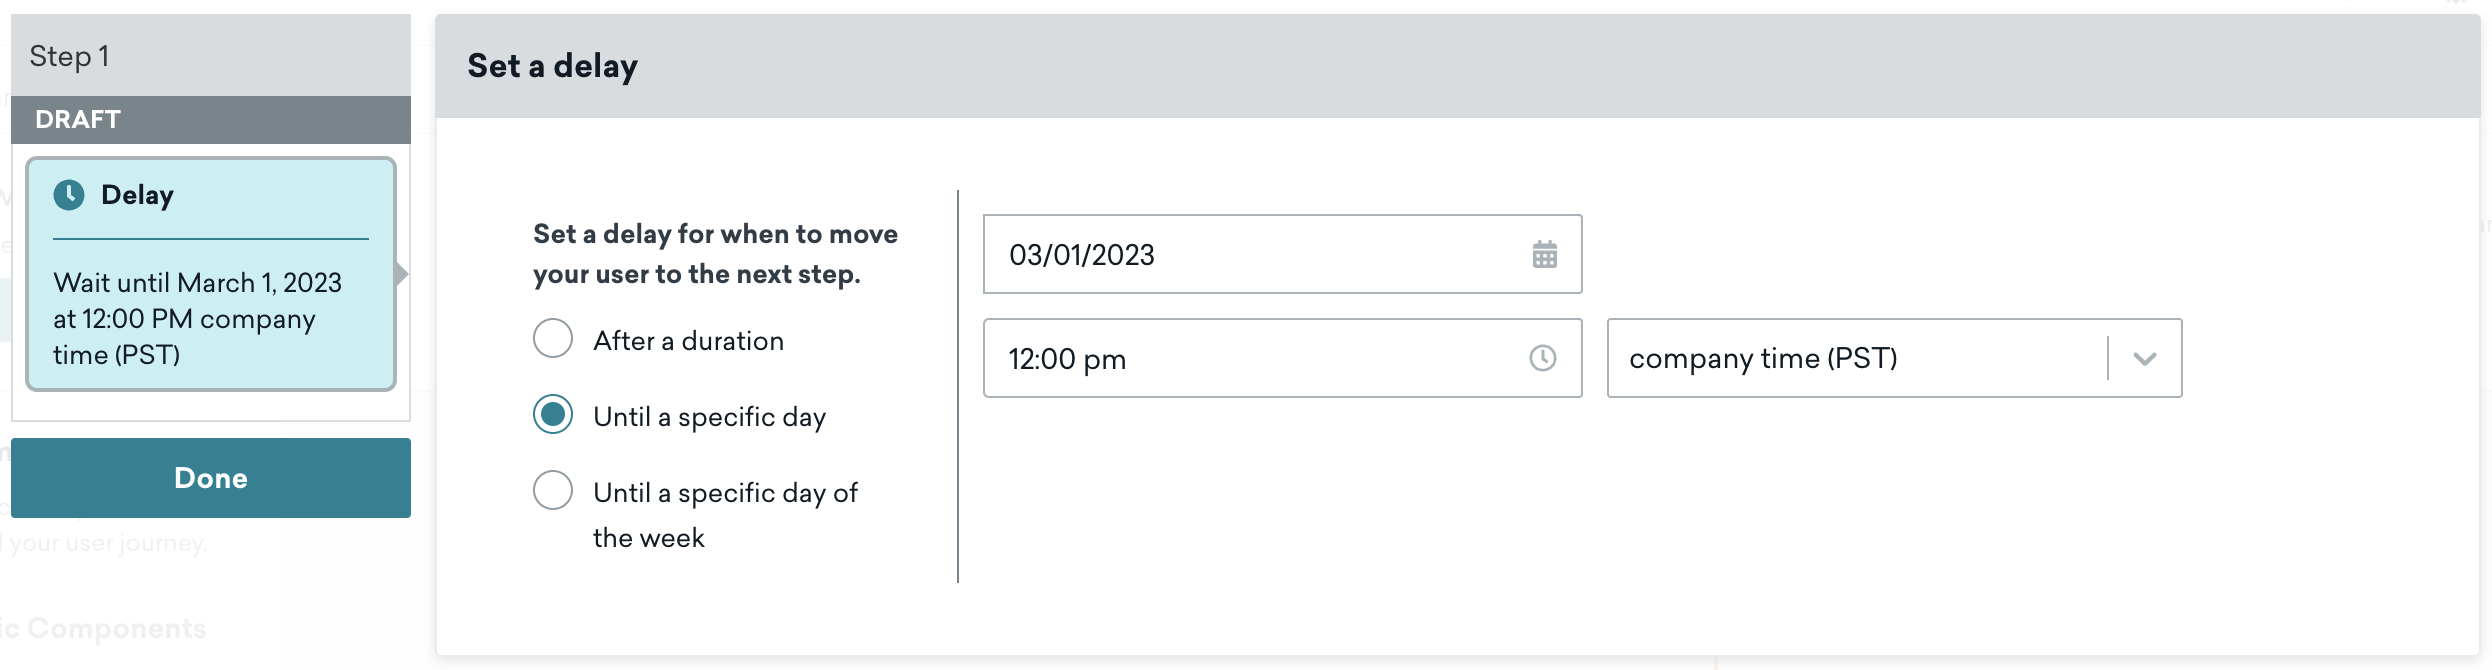
Editing a step
Looking to edit a step in your user journey? Check out how to do this depending on your Canvas workflow!
You can edit any step in your Canvas Flow workflow by clicking any of the components. For example, let’s say you want to edit your first step, a Delay component, in your workflow to a specific day. Click the step to view its settings and adjust your delay to March 1. This means on March 1, your users will move to the next step in your Canvas.
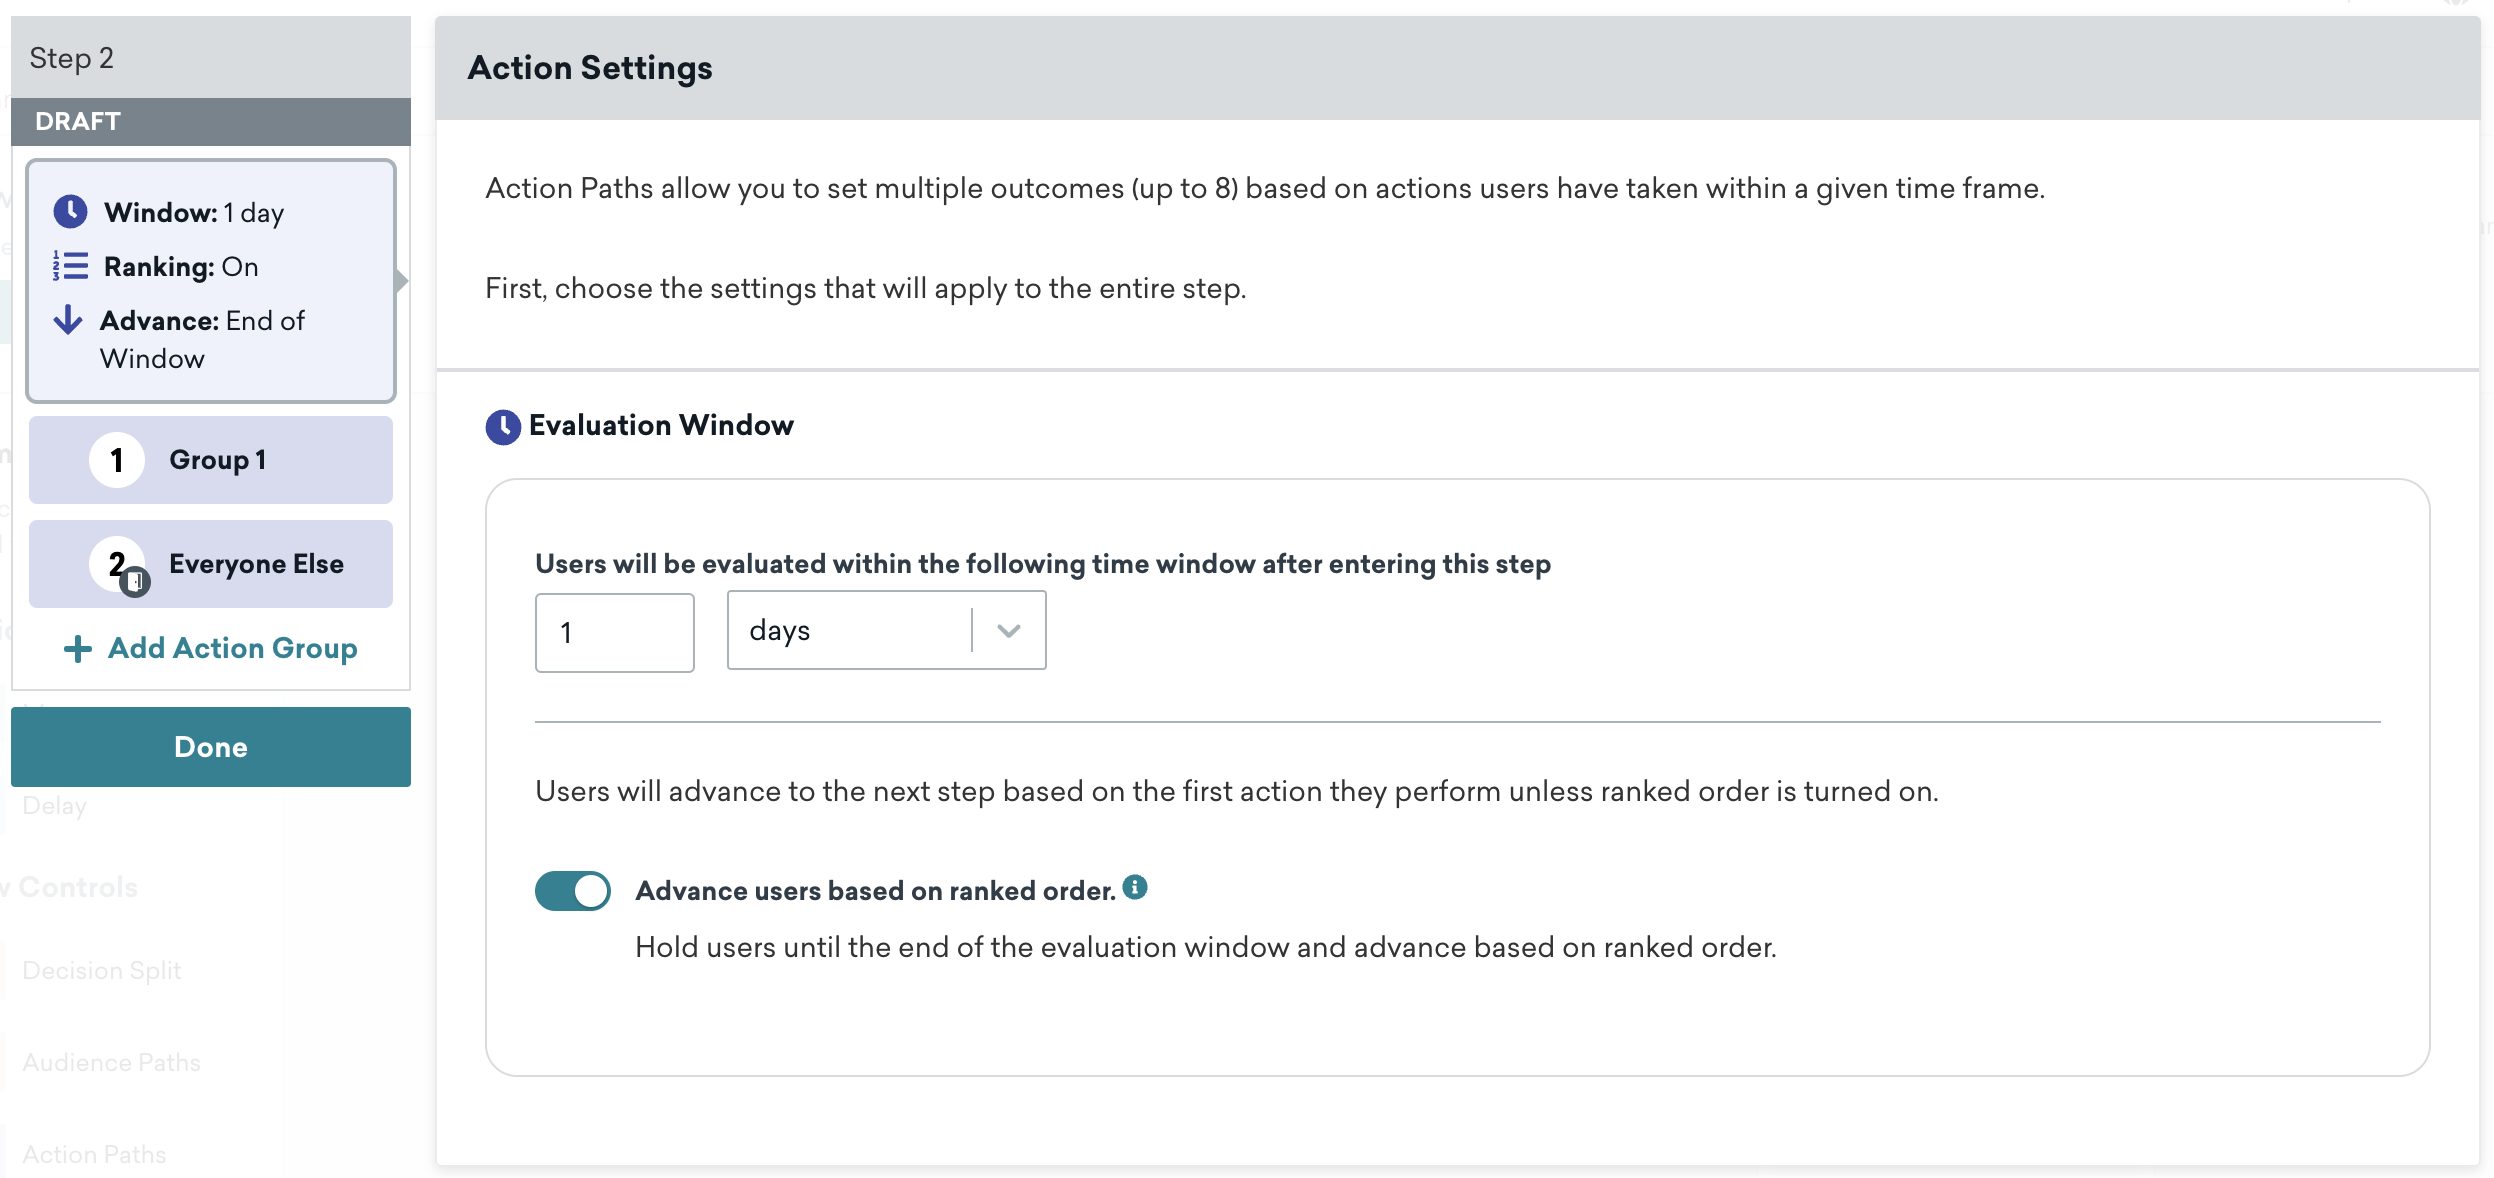
Or you can quickly edit and adjust the Action Settings of your Action Paths step to hold users for a window of time. This prioritizes their next path based on the actions during this evaluation period.
The lightweight components in Canvas allow for a simple editing experience, so adjusting the finer details of your Canvas is made easier.
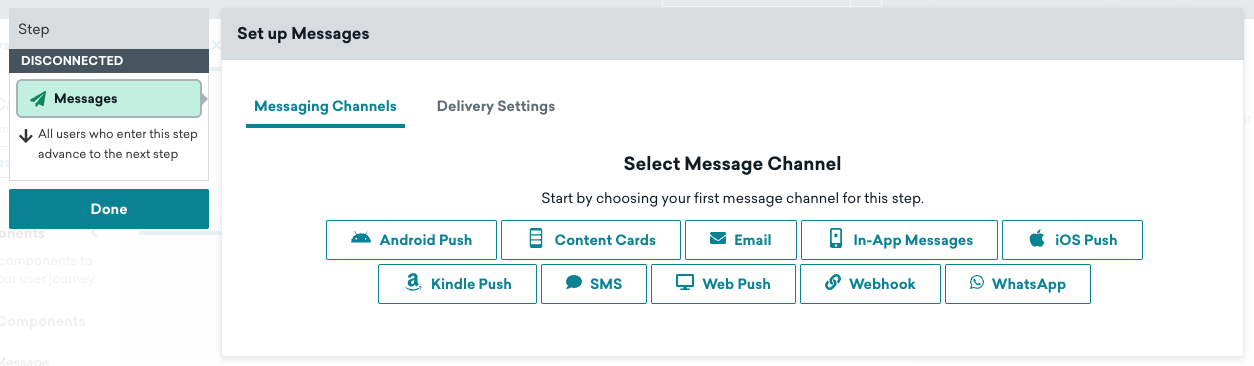
Messages in Canvas
Edit the messages in a Canvas component to control messages that a particular step will send. Canvas can send email, mobile, and web push messages, and webhooks to integrate with other systems. Similar to campaigns, you can use certain Liquid templating to personalize your messages.
Did you know you can include Canvas component names in your messages and link templates?
Use the campaign.${name} Liquid tag in Canvas to display the current Canvas component name.
The Message component manages the messages sent to users. You can select your Messaging Channels and adjust Delivery Settings to optimize your Canvas messaging. For more details on this component, check out Message.
Click Done after you’ve finished configuring your Canvas component.
The canvas_entry_properties are configured in the Entry Schedule step of creating a Canvas and indicate the trigger that enters a user into a Canvas. These properties can also access the properties of entry payloads in API-triggered Canvases. Note that the canvas_entry_properties object has a maximum size of 50 KB.
For Canvas Flow, entry properties can be used in Liquid in any Message step. Use the following Liquid when referencing these entry properties: canvas_entry_properties${property_name} . Events must be custom events or purchase events to be used this way.
Use the following Liquid when referencing these entry properties: canvas_entry_properties${property_name} . Note that the events must be custom events or purchase events to be used this way.
For example, consider the following request: \"canvas_entry_properties\" : {\"product_name\" : \"shoes\", \"product_price\" : 79.99}. You could add the word “shoes” to a message with this Liquid {{canvas_entry_properties.${product_name}}}.
Event properties are the properties set by you on custom events and purchases. These event_properties can be used in campaigns with action-based delivery as well as Canvases.
In Canvas Flow, custom event and purchase event properties can be used in Liquid in any Message step that follows an Action Paths step. Use this Liquid {{event_properties.${property_name}}} when referencing these event_properties. These events must be custom events or purchase events to be used this way in the Message component.
In the first Message step following an Action Path, you can use event_properties related to the event referenced in that Action Path. You can have other steps (that are not another Action Paths or Message step) in between this Action Paths step and the Message step. Note that you’ll only have access to event_properties if your Message step can be traced back to a non-Everyone Else path in an Action Path step
Editing connections
To move a connection between steps, click the arrow connecting the two components and select a different component. To break the connection, click the arrow and click Cancel Connection in the footer of the Canvas composer.
Step 4: Use multivariate testing using Canvas
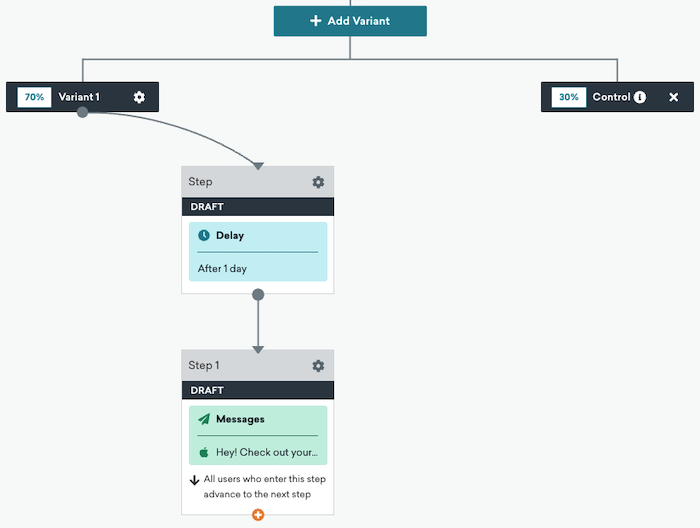
You can add a control group to your Canvas by clicking on the plus button to add a new variant.
Braze will track the conversions for users who are placed into the control group, although they will not receive any messages. To preserve an accurate test, we will track the number of conversions for your variants and the control group for exactly the same amount of time, as shown on the conversion event selection screen.
You can adjust the distribution between your messages by double-clicking the Variant Name headers.
In this example, we have our Canvas divided into two variants. Variant 1 has 70% of the users. The second variant is a control group with the remaining 30% of users.
Intelligent Selection for Canvas
Intelligent Selection capabilities are now available within multivariate Canvases. Similar to the Intelligent Selection feature for multivariate Campaigns, Intelligent Selection for Canvas analyzes the performance of each Canvas variant and adjusts the percentage of users being funneled through each variant. This distribution is based off each variant’s performance metrics to maximize the total expected number of conversions.
Keep in mind that multivariate Canvases allow you to test more than copy, but timing and channels as well. Through Intelligent Selection, you can test Canvases more efficiently and have confidence that your users will be sent on the best possible Canvas journey.
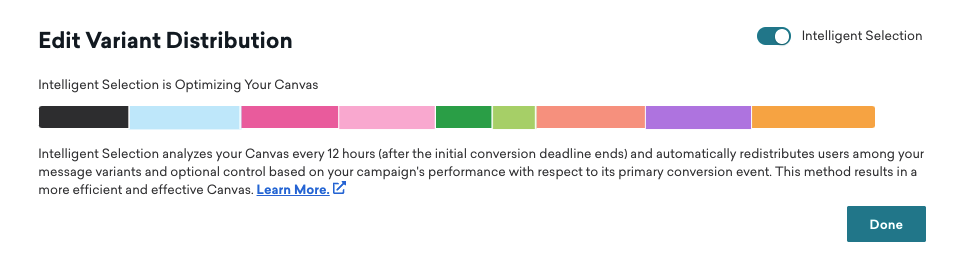
Intelligent Selection for Canvas optimizes your Canvas results by making gradual real-time adjustments to the distribution of users sorted into each variant. When the statistical algorithm determines a decisive winner among your variants it will rule out the underperforming variants and slot all future eligible recipients of the Canvas into the Winning Variants.
For this reason, Intelligent Selection works best on Canvases that have new users entering frequently.
Step 5: Save and launch your Canvas
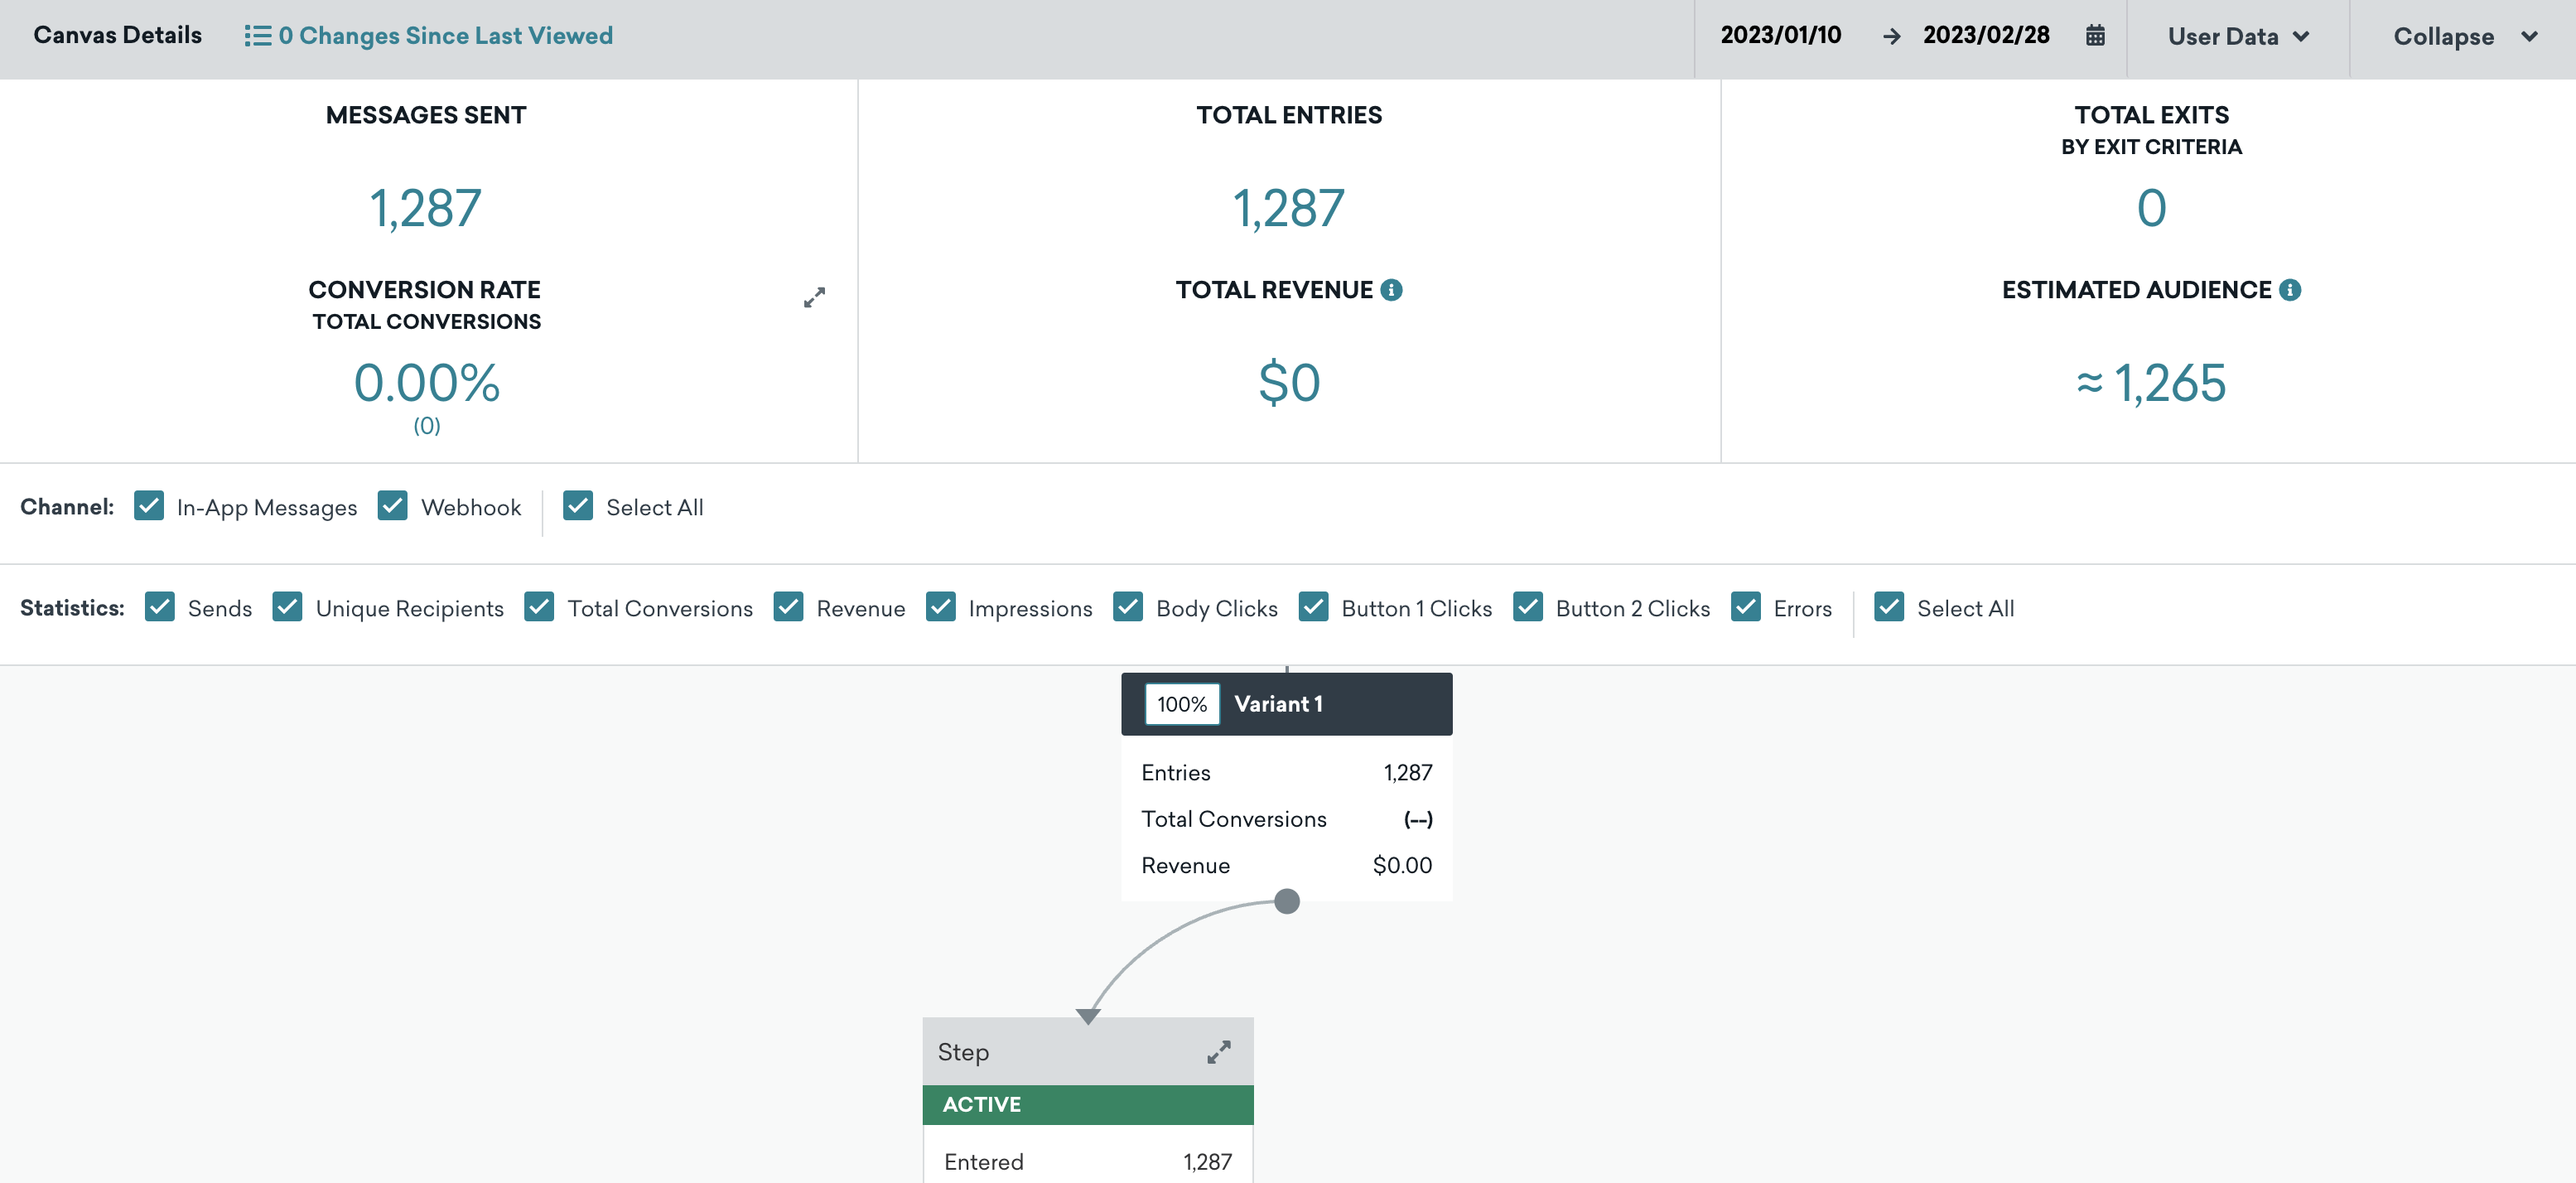
Once you’re done creating your Canvas, click Launch Canvas to save and launch your Canvas. After you’ve launched your Canvas, you’ll be able to view analytics for your journey as they come in on the Canvas Details page.
You can also save your Canvas as a draft if you need to come back to it.
Need to make edits to your Canvas after launch? Well, you can! Check out Editing Canvases after launch for more information.
 Edit this page on GitHub