Getting started with Shopify
This article outlines how to implement the Braze Web SDK onto your Shopify website. After implementation, view Setting up Shopify to learn how to finish setting up the Shopify integration with Braze.
Integration setup checklist
- Implement the Braze Web SDK
- Set up Shopify in Braze
- Test the Shopify integration
Implementing the Web SDK on your Shopify website
The Braze Web SDK is a powerful tool used to track the behavior of your Shopify store customers. With the Web SDK, you can collect session data, identify users, and record user behavior data from a web or mobile browser. You can also unlock native messaging channels like in-browser messages.
Although the Shopify integration offers a robust set of features out-of-the-box, keep in mind that if you have use cases to add onsite tracking for events not supported by the Shopify integration or want to add channels like Content Cards, you need to implement the Web SDK directly onto your Shopify site.
Before you begin onboarding the integration, please review the following with your team on which path you want to take to implement the Web SDK.
Supported features
| Icon | Definition |
|---|---|
| Supported | Supported |
| Supported | Not supported |
| Features | Web SDK via Shopify ScriptTag | Direct web SDK integration via theme.liquid | Direct web SDK integration via Shopify Hydrogen |
|---|---|---|---|
| Out-of-the-box on-site tracking | |||
| Capture form user reconciliation (Low engineering lift required) | |||
| Checkout user reconciliation | |||
| Product viewed Product clicked Abandoned cart |
|||
| Abandoned checkout Created order Braze Purchase Order paid Partially fulfilled order Fulfilled order Cancelled order Created refund Customer create & update |
|||
| Historical backfill | |||
| Catalog sync | |||
| Email and SMS subscriber collection | |||
| Out-of-the-box in-app message support | |||
| Out-of-the-box content cards support | |||
| Out-of-the-box web push support |
Implementing Braze Web SDK via Shopify ScriptTag
Shopify ScriptTag is a remote JavaScript code loaded into the pages of your store or the order status page of checkout. When a store page is loaded, Shopify will check to see if any script tags need to be loaded to the site page.
If you want to get started with Braze quickly, you have the option to allow Braze to load a pre-defined script for the Braze Web SDK directly onto your Shopify store site.
The pre-defined script for the Braze Web SDK for this integration method is not customizable.
How it works with the Shopify integration
When your Shopify site is loaded, Shopify will check to see if any script tags need to be loaded to the page. During the process, the Braze Web SDK scripts will be loaded onto the pages of your store or the order status page of checkout.
We’ll also add pre-defined scripts if you have selected product viewed, product clicked, and abandoned cart events that require Shopify ScriptTag or in-app messaging as a channel.
How to enable
To automatically enable the Braze Web SDK scripts as part of your integration, select the supported Shopify ScriptTag events or enable in-app messaging as a channel during your Shopify integration setup.
From the Shopify setup wizard, the events denoted with an asterisk (*) are supported by the Web SDK. If you select these events or include in-browser messaging, Braze will add the Web SDK implementation via Shopify ScriptTag to your Shopify store as part of your setup.
Shopify email capture forms and user reconciliation
Capture forms obtain identifiable customer information early in the customer’s lifecycle for downstream messaging and engagement.
The Web SDK tracks Shopify onsite behavior and anonymous users by using the device_id. The Braze Shopify ScriptTag integration assigns emails from Shopify email capture forms, such as a newsletter signup, to the user’s device_id.
Typical email capture forms include:
- Account login page
- Account registration page
- Email capture form
- Newsletter signup form
There are two ways to reconcile the user’s email and device_id:
- Using the Braze automated email capture script
- Adding your own call to the Braze
reconcileEmail()script.
Automated email capture script (early access)
The automated email capture script reconciles customer email input with the user’s device_id. There are several requirements for it to work properly:
- The textbox where the customer inputs their email must be an Input HTML Element under a Form HTML Element named “email”.
- The email must be entered through an HTML form submission, not a web service.
- All email input fields should be used for the customer to enter their own email address, or the wrong email may be assigned to the
device_id. For example, an email referral for friends and family would be incorrectly treated as the customer’s email and updated on the Braze user profile.
The automated email capture script is currently in early access. Contact your customer success manager if you’re interested in participating in this early access.
If your integration is already installed, it will need to be reinstalled at this point to complete its activation.
Calling reconcileEmail()
Adding calls to reconcileEmail() to your Shopify storefront’s website allows you to control exactly which input fields are used to assign a customer email to their device_id. We suggest you use this approach if your storefront does not meet the requirements for the automated email capture script.
Here are examples of how to implement the reconcileEmail method into your Shopify theme.liquid code:
Account and registration
- When a user is logged into Shopify, the customer object is defined. In the
theme.liquidfile, add the following snippet in thehead tag:
1
2
3
4
5
6
7
8
   <script>
      const customerPoller = setInterval(()=>{
        {% if customer %}
          reconcileEmail("{{customer.email}}");
        {% endif %}{}
        clearInterval(customerPoller)
      }, 2000)
    </script>
- We first call
setIntervalso that the BrazeSDK is loaded first - We use Liquid to check if a customer object is set on the page
- If there is a customer, we call
reconcileEmail - We retrieve email value in the Liquid form
customer.email - After the script loads, we call
clearIntervalso that it loads only once - You can check the console to confirm the email is reconciled
Newsletter and email capture forms
- In
theme.liquid, copy the following snippet in thehead tag:
1
2
3
4
5
6
7
8
9
10
11
12
13
    <script>
         const emailInputPoller = setInterval(()=>{
      if (document.getElementById('{FORM_ID}')) {
        document.getElementById('{FORM_ID}').addEventListener("submit",
          function() {
            var email = document.getElementById('{INPUT_EMAIL_ID}').value
            reconcileEmail(email)
          }
        );
      }
      clearInterval(emailInputPoller)
        }, 2000)
    </script>
- We first call
setIntervalso that the script is loaded first - Replace
{FORM_ID}with the element ID of the form you want to capture (such as “ContactFooter”.) - Replace
{INPUT_EMAIL_ID}with the element ID of the email input field inside the form - When the form is submitted, the script will call
reconcileEmailwith the email input value - After the script loads, we call
clearIntervalso that it loads only once - You can check the console to confirm the email is reconciled
At this time, the Braze email capture form will not create a Shopify customer. As a result, you could have Braze user profiles without associated Shopify user profiles until the customer goes through checkout or creates an account.
What to expect after implementation
Braze Web SDK initialization
The Web SDK will initialize upon session start. Braze will need to collect the device_id for tracking anonymous user data as other identifiers like the Shopify customer ID, email, or phone number may not be readily available for guest visitors of your Shopify store.
The device_id will also be used to reconcile user data to the anonymous user profile as a customer provides more identifiable information (such as an email address or phone number) during and after the checkout process.
Braze Web SDK version
The current version of the Braze Web SDK via Shopify ScriptTag integration is v4.2.
Monthly Active Users (MAU)
The Web SDK tracks sessions of your Shopify customers and guests. As a result, this will accrue as MAU within your Braze dashboard reporting and toward your MAU allotments. It is important to note that anonymous users will also count toward your MAU. For mobile devices, anonymous users are device-dependent. For web users, anonymous users are browser cache-dependent.
Implementing the Web SDK directly onto your Shopify site’s theme.liquid
Braze offers multiple ways to implement the Web SDK including:
- Adding the Web SDK directly to your Shopify
theme.liquidfile - Google Tag Manager
If you already have the Web SDK installed on your Shopify store, you can still proceed with setting up the Shopify ScriptTag within the onboarding process.
During the installation process, Braze will check if instances of the Web SDK are already available on your Shopify store. If there is an existing implementation, Braze will not load the pre-defined scripts for enabling the Web SDK. We’ll then add the necessary scripts to make sure you can track the selected events or enable in-browser messaging.
How to enable
To manually implement the Web SDK, view Initial SDK setup. To implement the Web SDK via Google Tag Manager, view Google Tag Manager for Web.
With either implementation path, make sure that your Web SDK integration includes the following or the Shopify integration will not be supported:
- Web SDK version of v4.0+
- Web SDK initializes upon session start
Shopify email capture forms and user reconciliation
Capture forms obtain identifiable customer information early in the customer’s lifecycle for downstream messaging and engagement.
The Web SDK tracks Shopify onsite behavior and anonymous users by using the device_id. The Braze Shopify ScriptTag integration assigns emails from Shopify email capture forms, such as a newsletter signup, to the user’s device_id.
Typical email capture forms include:
- Account login page
- Account registration page
- Email capture form
- Newsletter signup form
There are two ways to reconcile the user’s email and device_id:
- Using the Braze automated email capture script
- Adding your own call to the Braze
reconcileEmail()script.
Automated email capture script (early access)
The automated email capture script reconciles customer email input with the user’s device_id. There are several requirements for it to work properly:
- The textbox where the customer inputs their email must be an Input HTML Element under a Form HTML Element named “email”.
- The email must be entered through an HTML form submission, not a web service.
- All email input fields should be used for the customer to enter their own email address, or the wrong email may be assigned to the
device_id. For example, an email referral for friends and family would be incorrectly treated as the customer’s email and updated on the Braze user profile.
The automated email capture script is currently in early access. Contact your customer success manager if you’re interested in participating in this early access.
If your integration is already installed, it will need to be reinstalled at this point to complete its activation.
Calling reconcileEmail()
Adding calls to reconcileEmail() to your Shopify storefront’s website allows you to control exactly which input fields are used to assign a customer email to their device_id. We suggest you use this approach if your storefront does not meet the requirements for the automated email capture script.
Here are examples of how to implement the reconcileEmail method into your Shopify theme.liquid code:
Account and registration
- When a user is logged into Shopify, the customer object is defined. In the
theme.liquidfile, add the following snippet in thehead tag:
1
2
3
4
5
6
7
8
   <script>
      const customerPoller = setInterval(()=>{
        {% if customer %}
          reconcileEmail("{{customer.email}}");
        {% endif %}{}
        clearInterval(customerPoller)
      }, 2000)
    </script>
- We first call
setIntervalso that the BrazeSDK is loaded first - We use Liquid to check if a customer object is set on the page
- If there is a customer, we call
reconcileEmail - We retrieve email value in the Liquid form
customer.email - After the script loads, we call
clearIntervalso that it loads only once - You can check the console to confirm the email is reconciled
Newsletter and email capture forms
- In
theme.liquid, copy the following snippet in thehead tag:
1
2
3
4
5
6
7
8
9
10
11
12
13
    <script>
         const emailInputPoller = setInterval(()=>{
      if (document.getElementById('{FORM_ID}')) {
        document.getElementById('{FORM_ID}').addEventListener("submit",
          function() {
            var email = document.getElementById('{INPUT_EMAIL_ID}').value
            reconcileEmail(email)
          }
        );
      }
      clearInterval(emailInputPoller)
        }, 2000)
    </script>
- We first call
setIntervalso that the script is loaded first - Replace
{FORM_ID}with the element ID of the form you want to capture (such as “ContactFooter”.) - Replace
{INPUT_EMAIL_ID}with the element ID of the email input field inside the form - When the form is submitted, the script will call
reconcileEmailwith the email input value - After the script loads, we call
clearIntervalso that it loads only once - You can check the console to confirm the email is reconciled
At this time, the Braze email capture form will not create a Shopify customer. As a result, you could have Braze user profiles without associated Shopify user profiles until the customer goes through checkout or creates an account.
What to expect after integration
Braze Web SDK initialization
The Web SDK will initialize upon session start. Braze will need to collect the device_id for tracking anonymous user data as other identifiers like the Shopify customer ID, email, or phone number may not be readily available for guest visitors of your Shopify store.
The device_id will also be used to reconcile user data to the anonymous user profile as a customer provides more identifiable information (such as their email or phone number) during and after the checkout process.
Braze Web SDK version
The current version of the Braze Web SDK should be v4.0+.
Monthly Active Users (MAU)
The Web SDK tracks the sessions of your Shopify customers and guests. As a result, this will accrue as MAU within your Braze dashboard reporting and toward your MAU allotments. It is important to note that anonymous users will also count toward your MAU. For mobile devices, anonymous users are device-dependent. For web users, anonymous users are browser cache-dependent.
Implementing the Web SDK directly onto your headless Shopify site
The Braze Shopify ScriptTag integration is incompatible with headless Shopify sites. As a result, you will not be able to get out-of-the-box support for product viewed, product clicked, or abandoned cart events, or enable in-app messaging through our pre-defined scripts.
How to enable
To directly integrate the Web SDK to your headless Shopify site, refer to Inital SDK Setup for Web.
Make sure that your Web SDK integration includes the following:
- Web SDK version should be v4.0+
- Web SDK initializes upon session start
Setting up Shopify forms for user reconciliation
Ecommerce brands likely have experiences on their Shopify site to capture identifiable information from customers ahead of checkout, like email capture forms.
The Web SDK tracks Shopify onsite behavior and anonymous users with the device_id. To confirm that email addresses are added to the anonymous user profile, add the following to either a newsletter or email capture form:
- setEmail
- For email capture or newsletter signups
- addAlias
- “alias_label”: “shopify_email”
- “alias_name”: “[email protected]”
When users register or log into their account, you may want to identify the user profile with an external ID. After the user registers and logs in, add the changeUser method to assign an external ID if a user creates an account or logs in.
If you set a temporary alias on the user profile, you can proceed to make a request to the users/merge endpoint endpoint to identify the user at a later point.
Setting up checkout user reconciliation
When you enable the abandoned checkout event, Braze will receive the Shopify checkouts/create webhook. Braze will attempt to match to an existing user profile by either email address, phone number, or Shopify customer ID. If no match exists, Braze will create an alias profile.
To make sure that the user profile tracked onsite merges with the Shopify alias user profile created by the Shopify webhooks, you can use the /users/merge endpoint by following the steps below.
You can log a custom event via the SDK or API call made on the theme.liquid file to trigger a Canvas that includes a request to the users/merge endpoint. These methods are outlined below.
As soon as a customer visits your Shopify site, an anonymous user is created. This user is automatically assigned a Braze device_id.
-
Randomly assign a unique user alias for your site visitor upon a new session.
-
As users perform actions on your site, log them as custom events or capture user attributes. When the user proceeds to checkout and inputs their email into a Shopify form, a Shopify customer ID is created. Braze will process Shopify webhooks and create a new user profile if the email, phone, or Shopify alias doesn’t match an existing user.
1
2
3
4
5
6
{
  "user_alias": {
    "alias_name": 1234,
    "alias_label": "temp_user_id"
  }
}
- To prevent duplicate user profiles, you need to merge the user profile containing the Braze
device_idwith the user profile containing the Shopify alias profile. You can create an API-triggered Canvas that will set a delay, update your user with thedo_not_mergeattribute, and make a request to the/users/mergeendpoint. You can also log a custom event likemerge_userto trigger your Canvas.
- When users exit the flow or complete checkout, you can log a custom event, like
merge_user, to trigger a Canvas that will set a delay, update your user with thedo_not_mergeattribute, and make a request to the/users/mergeendpoint.
- In your Canvas entry criteria, target only unidentified user profiles, meaning that they don’t have an external ID and
do_not_mergeis not true.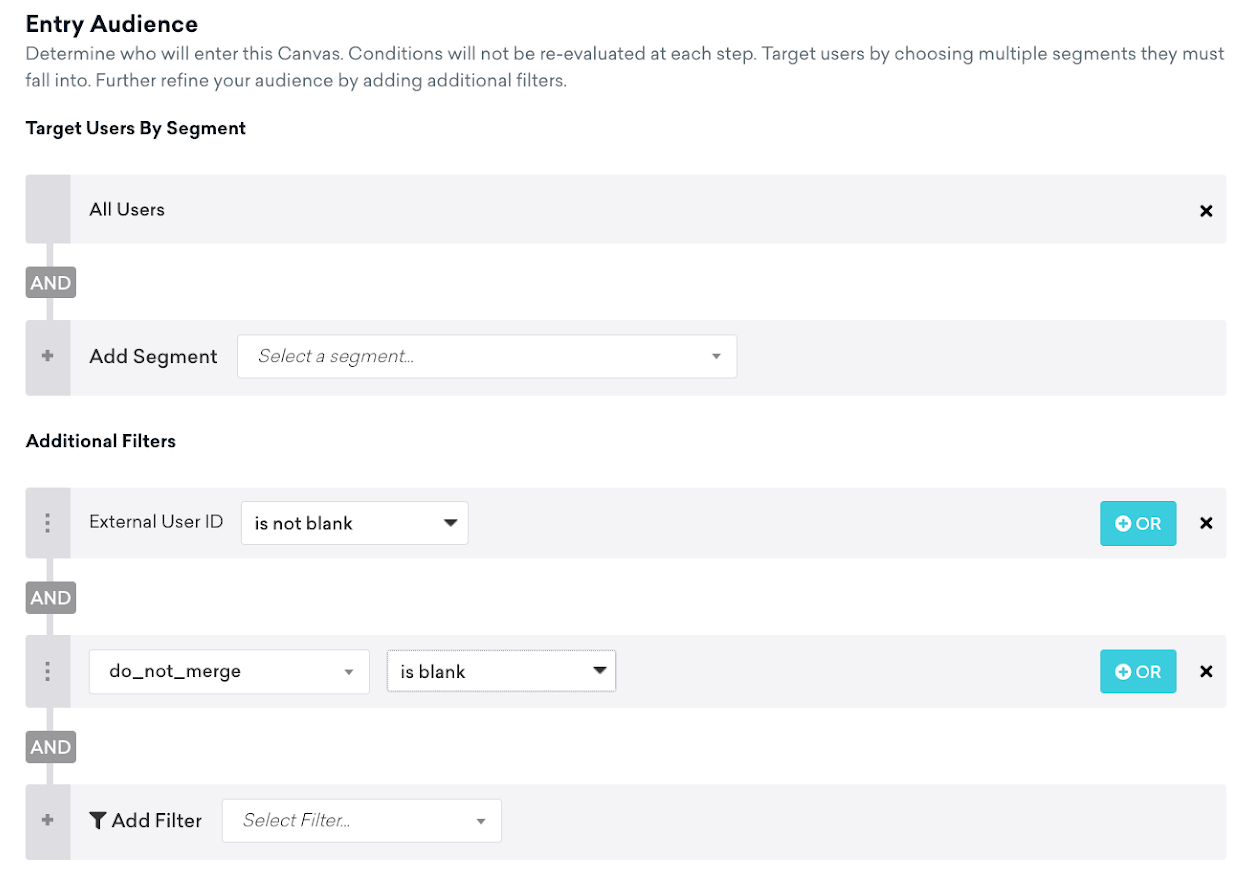
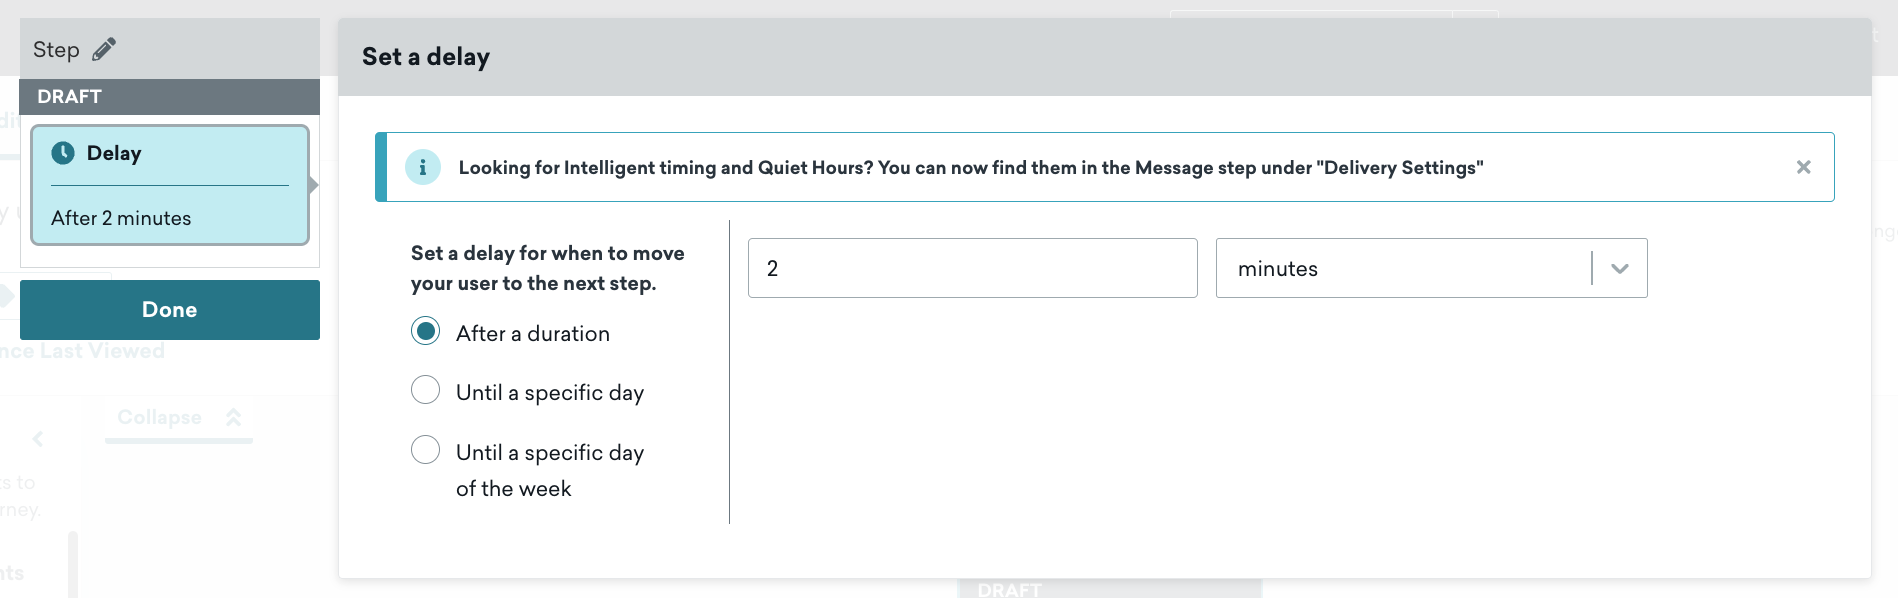
- After configuring your Canvas entry criteria, you can create your Canvas Flow. Make the first step of your Canvas a Delay step to prevent possible race conditions during processing.
- You can create a User Update step to update
do_not_mergecustom attribute to “true” as these users will be merged in the next step.
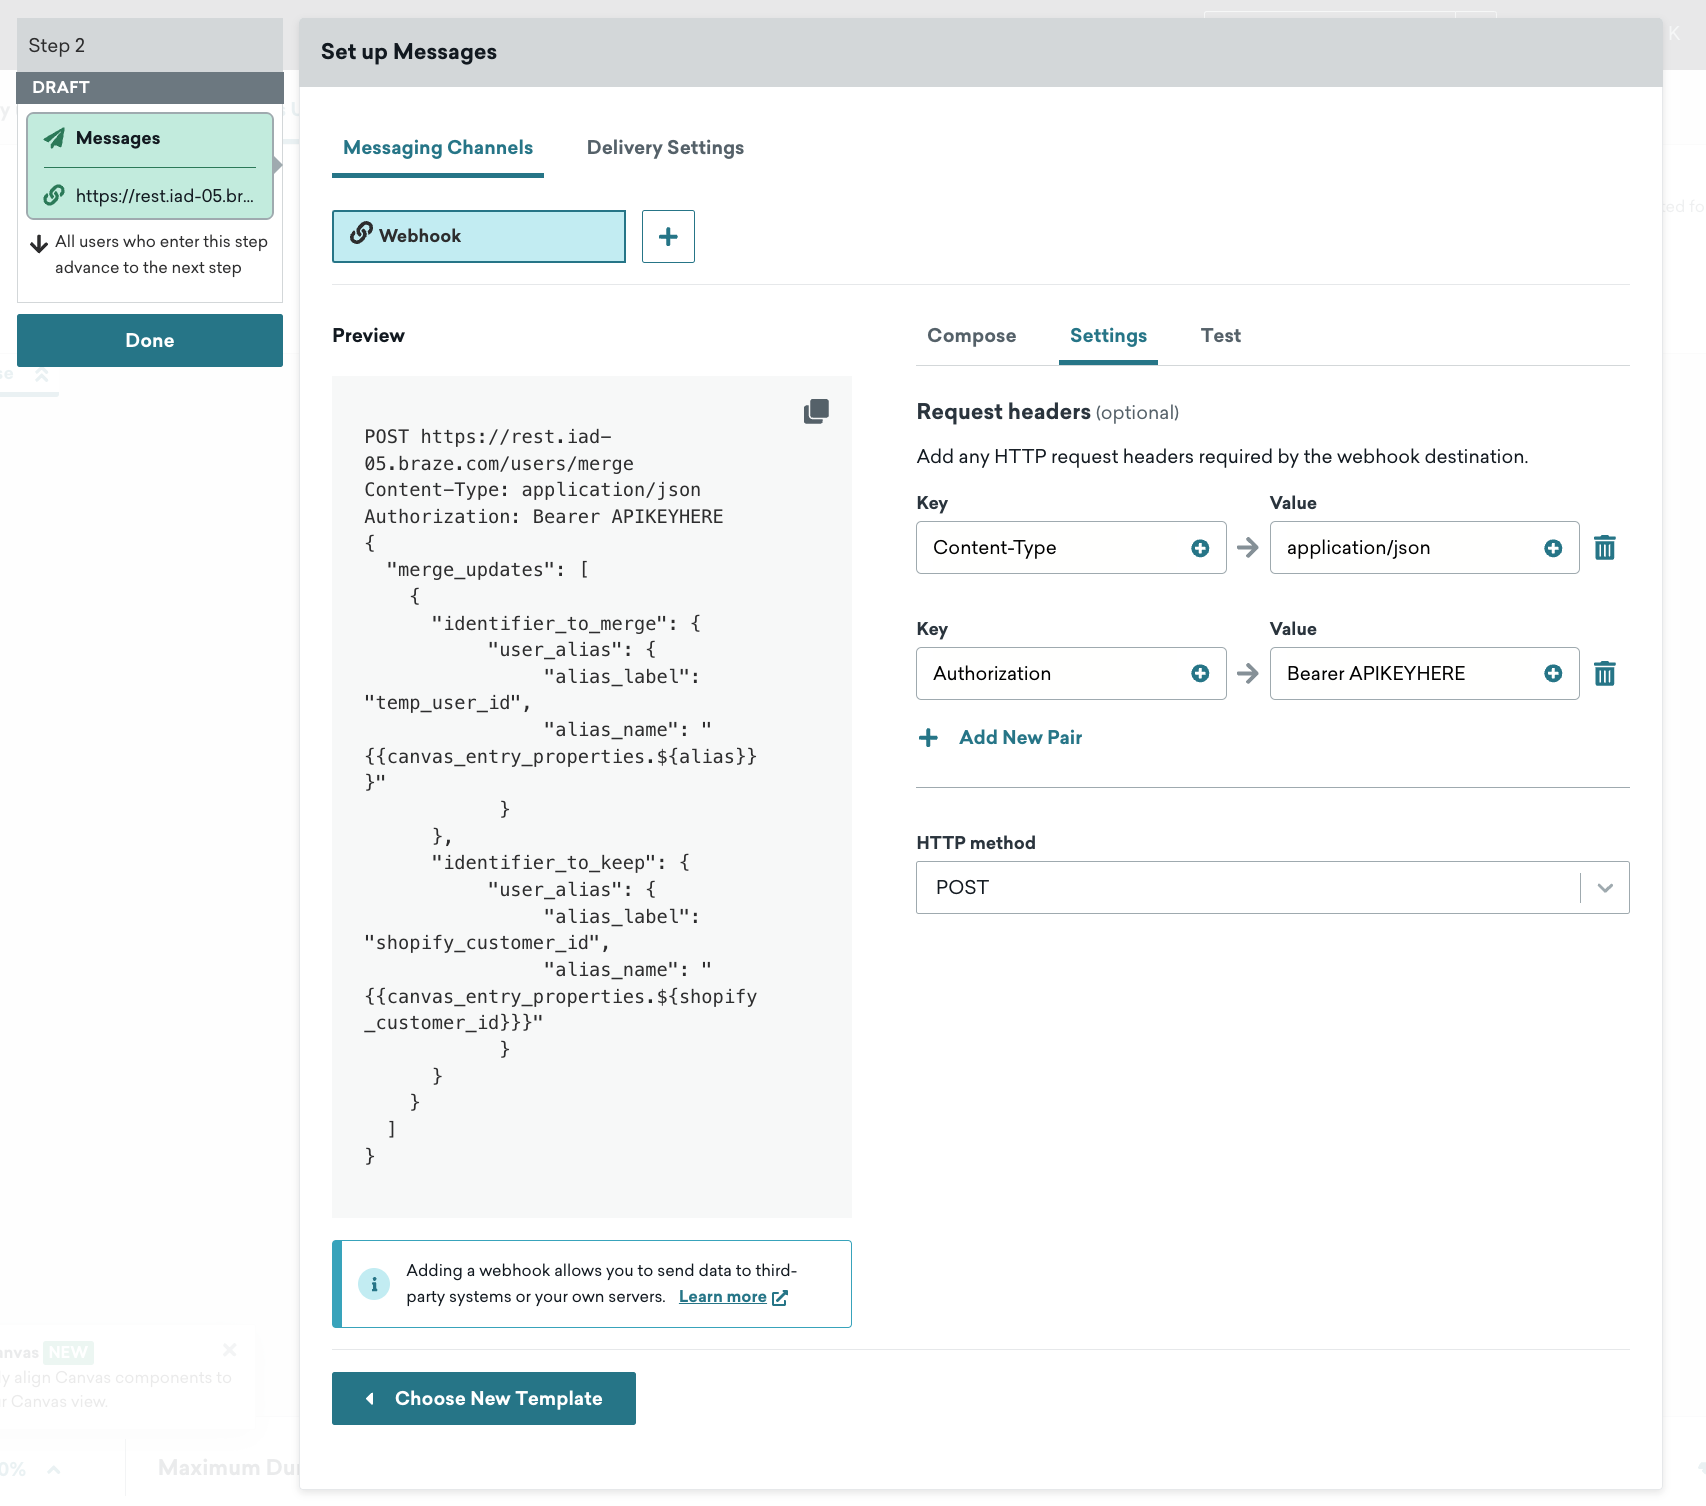
- Next, create a Message step with a webhook.
1
2
3
4
5
6
7
8
9
10
11
12
13
14
15
16
17
18
{
  "merge_updates": [
    {
      "identifier_to_merge": {
           "user_alias": {
                "alias_label": "temp_user_id",
                "alias_name": "{{canvas_entry_properties.${temp_user_id}}}"
            }
      },
      "identifier_to_keep": {
           "user_alias": {
                "alias_label": "shopify_customer_id",
                "alias_name": "{{canvas_entry_properties.${shopify_customer_id}}}"
            }
      }
    }
  ]
}
For information about merge_users behavior, see POST: Merge users.
- As users exit the flow or complete checkout, subsequent Shopify webhooks will be matched by email address or phone number or using the Shopify alias.
 Edit this page on GitHub